What’s a Picture Worth?

I have a husband who is good with projects. He’s creative, finds solutions, puts his own spin on it and voila!, problem solved and we have this repaired/renovated/new thing we didn’t have before that looks amazing. He gets out his phone and takes a picture of this thing and then I hear it:

“I sure wish we’d take a picture of this [insert project name here] before I started….”

I can’t tell you how many times we’ve both said that exact same phrase over the last 20 years. You’d think by now we’d have caught on and learned, right? The reality is, while we are catching on, we get the before photo maybe 20% of the time. Most of the time we think about it halfway in, when we’ve either started digging, moved furniture, or have half a structure built. We do get the photos then, and at the completion too, but it’s tougher to share the change with family and friends if they a) have never visited our house or b) haven’t been here in a while and don’t recall what it looked like in the first place.

This past year, confined to home as much as we were, quite a few more projects were tackled including painting the kitchen cabinets, building an enclosure for the garbage cans, adding a stepping stone path from the patio to the shed, building shelves for our CD and record collection, painting our front door and updating a bathroom. I think we had before photos for everything except where the CD and records went, (and he may have actually done that too), so I was thinking we really might have kicked that bad habit until a few days ago. He was getting ready to begin the second part of a project when I heard “I wish we had a picture of this from before we started”.

The other part of taking the before and after however, is the ‘in-betweens’, which I define as getting the photos of all of the work that went into the project and making the magic happen, and my husband is awesome at that. I think projects are like labor pains – once you see your finished project and how great it looks, you forget all about the pain and difficulty it took to get there. But having those in-betweens? You’ll never forget. Our project photos for the front door are time and date stamped, so of course I will always know we did it over my long July 4 weekend off from work, but they also remind me of how beastly hot and humid it was, and of the fact that the damn door had 5 – FIVE – coats of paint (including the primer) on it that needed to come off because it had bubbled and cracked, and when it had been painted before they used a roller and flat paint so all of the roughness showed. Our photos show the multiple coats of citrus stripper, the mess in the garage, our open front door being taped cover with a couple of huge pieces of cardboard to keep the house air conditioned. They don’t show that we pushed the coffee table against the cardboard and stacked stuff on that, so in case anyone tried to come through the cardboard it would make a horrid racket and wake us up. Not that we would wake up anyhow, since we were sleeping 10 feet away on our sleeper sofa. I don’t need photos for that!

The project photos also help me remember how we tried to seal off the kitchen with plastic so that dust from sanding wouldn’t go everywhere in the house. I kind of felt like I was in some sort of biohazard zone, wearing my particle mask so as not to inhale microscopic varnish bits. Yeah, like I could forget THAT! (Actually I probably could, it bordered on traumatic.)

2021 is still young, maybe we’ll only forget this once.

Now that it’s all said and done, here are a few of our 2020 projects, before and after. Just don’t ask to see the ‘in-betweens’.

Befores Afters

Advertisement

Things Mom Never Told You

I think it’s a tradition that a long holiday weekend is made for tackling house projects, right? Going with that theme, we decided to undertake one that had been in our minds for a long time, which was repainting the outside of our front door. The previous owners had this thing about brown…everything in this house was either dark brown or baby poop brown. We’ve been trying to get everything inside painted and made less depressing for years and finally finished that up 2 years ago. It was time for the exterior of the front door to get a face lift.

As you can see, the paint was faded, and badly cracked and if you look closely you can even see where they had painted the old hardware purple, then scraped it off again with God only knows what, because if you have to remove it why would you bother with something like acetone that can get into the nooks and crannies? FF191DB3-4815-415D-AE47-F2B216B4DCE8
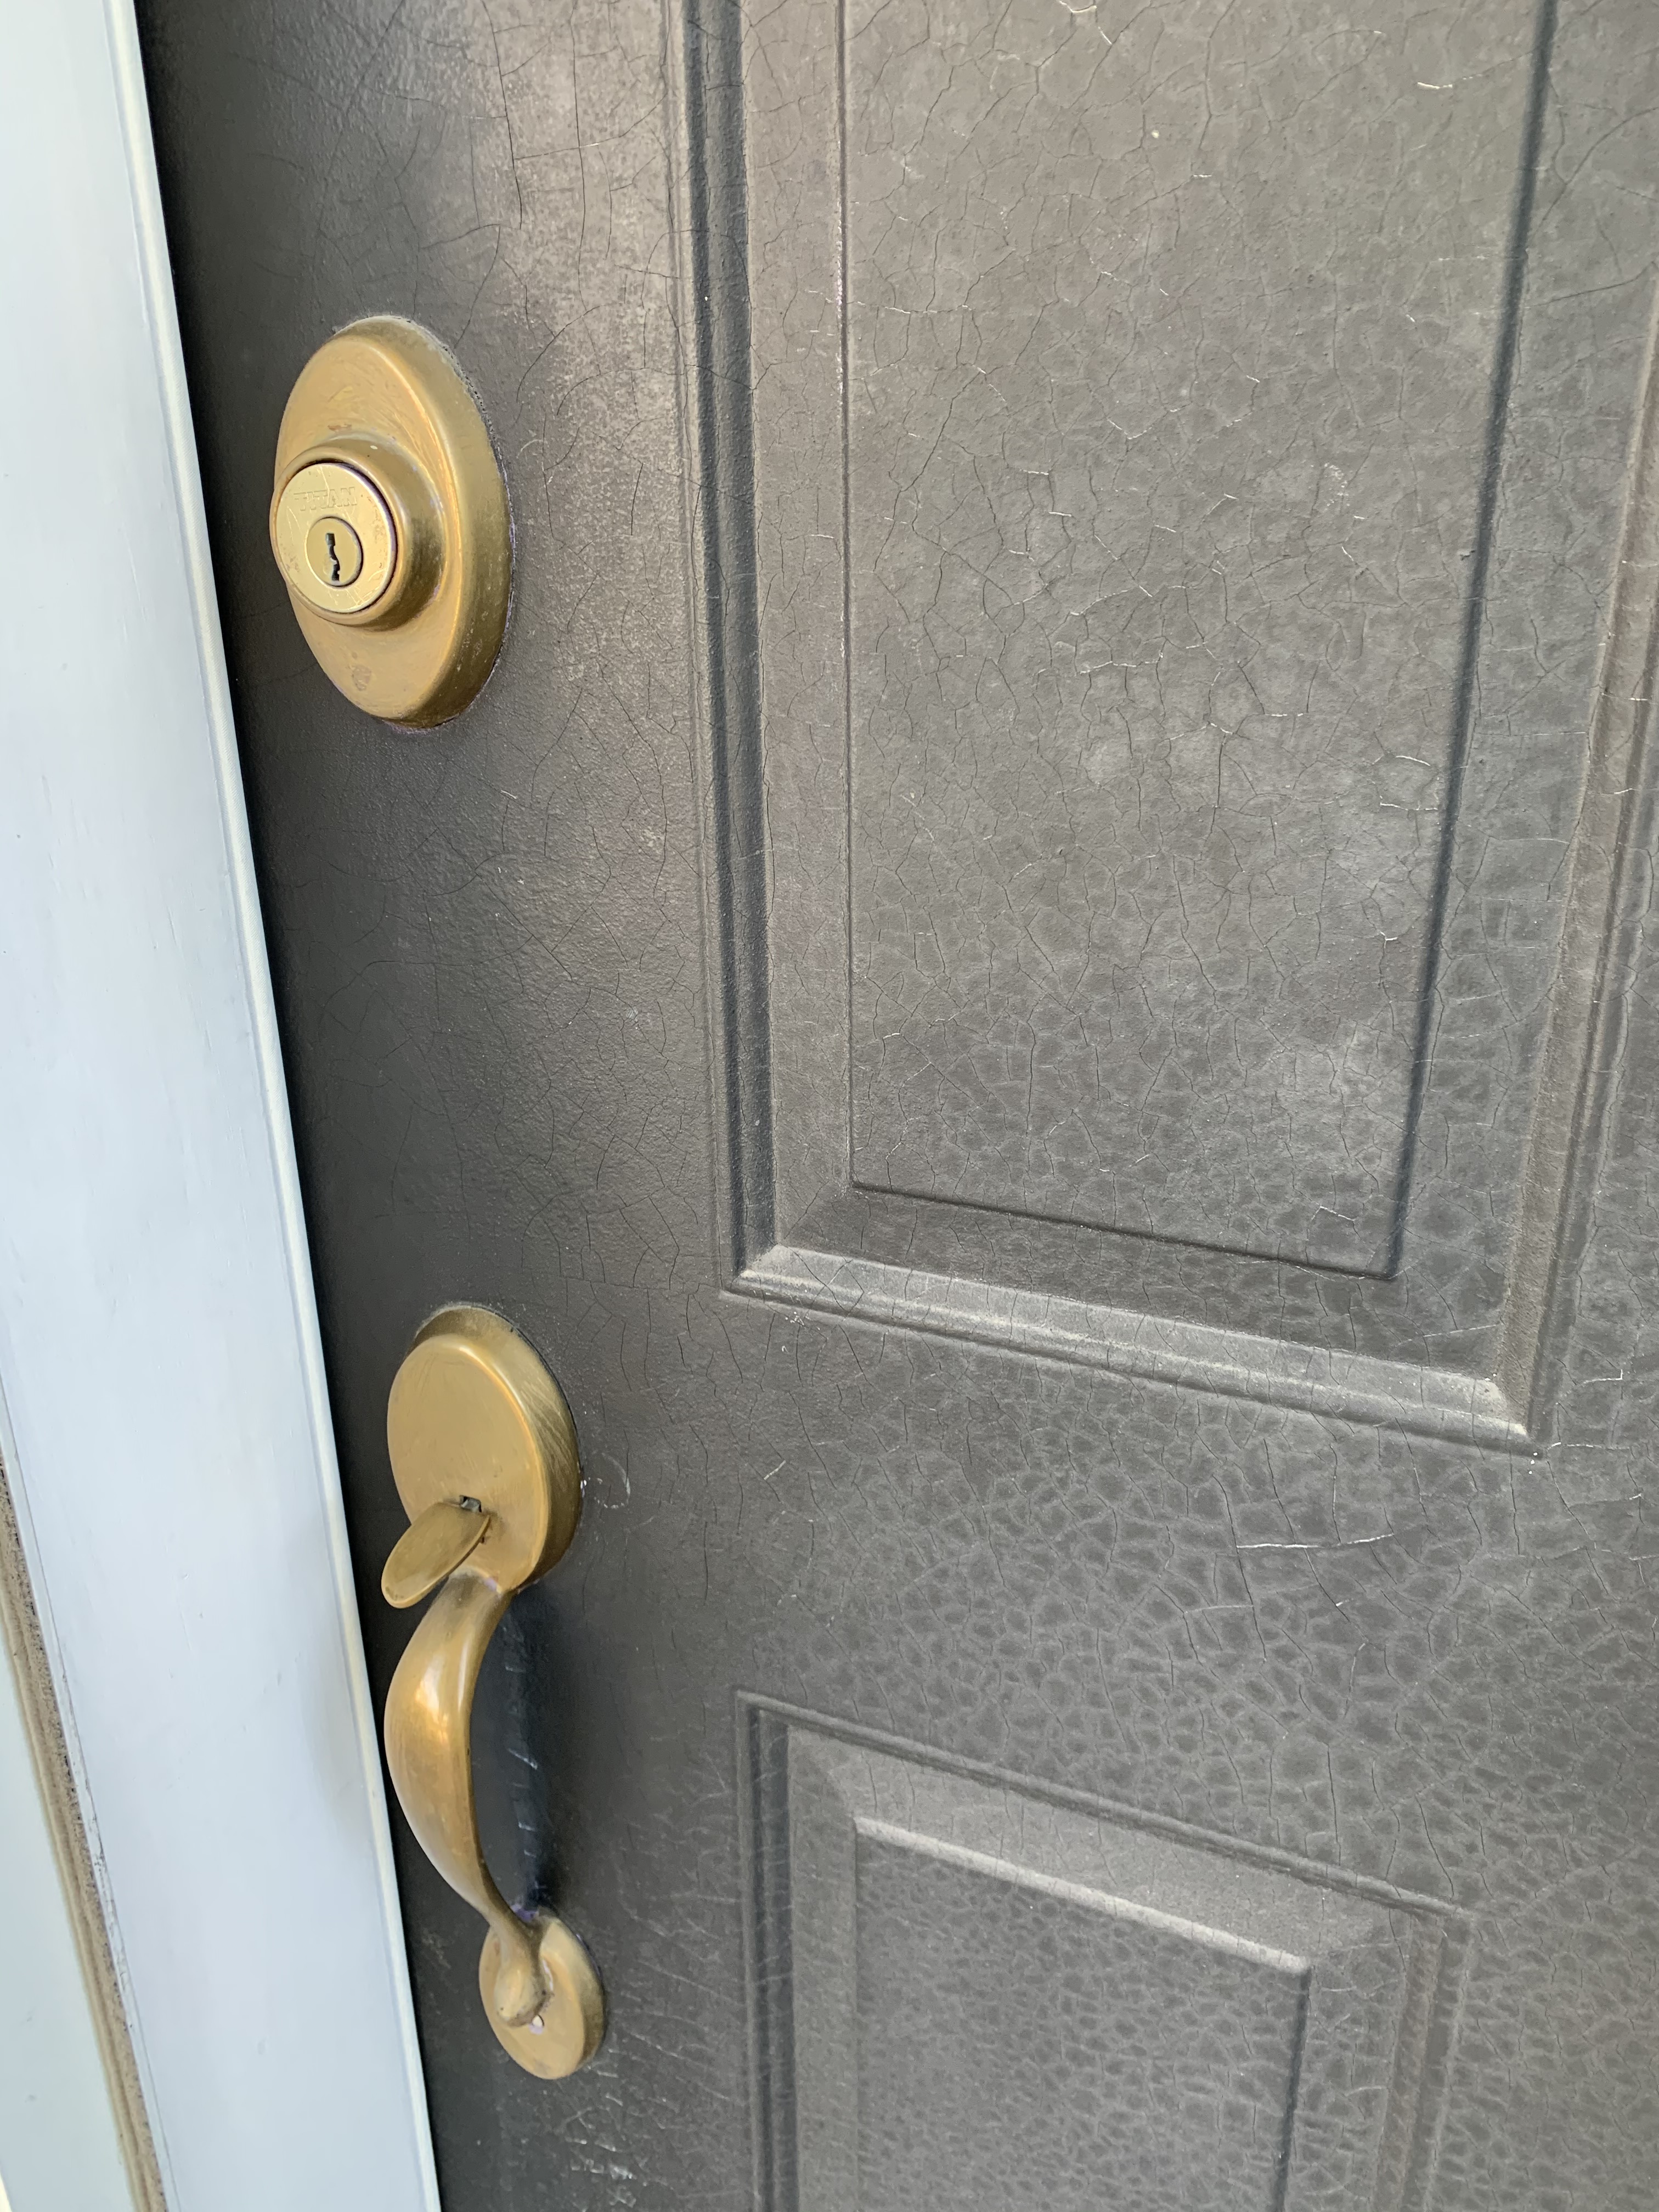
Nah, just scrape and scratch and hope for the best, right? Don’t tape anything off either, like the bottom weather stripping, just paint right over it. Sigh. In any case, we’d lived with it for 8 years which was about 7.5 years too long. With a long holiday weekend looming, we had plenty of ambition to get us started.

We thought we would start first thing on Friday morning, put stripper on the door, and with a little luck we’d be painting by late in the day, have the door back on maybe by midnight? Unbeknownst to us, however, the door didn’t have a single layer of paint; counting the original primer, it had 5! Factor in that our door faces SW, and in the winter we have a glass panel in the screen door so the sun beating through it makes that door so hot you can’t even touch it, and all that paint was absolutely baked on over the years.

It took us 2 solid days of stripping, scraping, stripping, scraping etc., in the garage, to get those 5 layers off. Yeah, it’s funny now, but no one tells you when you start these projects “DO NOT START WHEN IT’S 95 DEGREES AND 70% HUMIDITY – FOR THE NEXT 3 DAYS!”.  It was miserable, but of course once you start, well, you know the old saying “in for a penny, in for a pound”. We put a huge piece of cardboard over our front door to seal it up and keep the house cool, and while effective it certainly wasn’t secure, so we also slept on our living room sofa sleeper for 4 nights because we didn’t feel comfortable being too far from a basically open doorway. After that I am really glad we also have a guest bed for guests to sleep on and the sleeper is a backup plan.

I’m sure that the citrus strippers really are the better and safer way to go for this kind of thing but honestly, the amount of time it took, I almost wonder if a product like the old Zip Strip wouldn’t have been faster. Certainly more toxic, but faster would have been better. And when it was finally all free of paint and down to bare metal, it needed to be wiped clean with mineral spirits, and then re-primed, which started another whole level of learning.

Did you know you can’t prime bare metal with regular primer? Nope, you need to use primer for clean metal, which is an epoxy primer and needs to dry for 24 hours in a very well-ventilated area. Well I guess the garage met that criteria, but here’s the dilemma. If you leave the doors open, you get dust and other schumtz flying around and possibly sticking on the fresh primer and paint. If you close the doors in 95 degrees and 70% humidity, eliminating ANY chance of air movement? ARGH!! (Smacking head on wall.) Then it was FINALLY time to paint it, and it was beautiful. To be safe we let the paint dry a day and a half before putting the new hardware on and putting the door in place.

The Big RevealBB079B48-2376-4C24-809B-1524BBDD6882

I feel like this color is perfect for us!! I look at it and feel like I’m down island somewhere. We are now the ones that people will say “you’ll know their house by the front door. Trust me.” I love that. It’s fun, cheerful, inviting and oh so welcoming, which is truly how we want you to feel here.

Unfortunately, now that the main door looks so great, it makes me see all the flaws in the screen door, so I’m pretty sure that new hardware isn’t too far behind for that, and maybe even a coat of fresh white paint too. Oh yeah, and paint on the wood trim around the door, and…

It never quits.

The Great Refrigerator Adventure

As I mentioned in a recent post, we’ve been updating the kitchen appliances, and decided it was time to replace the fridge when it appeared it was possessed. We had a side-by-side that was 18 years old, and it had been repaired a couple of times already. The last time he was here, the repairman said to me “don’t spend money repairing it again, it’s not worth it. You’ve already sunk more into it that it would cost to buy a new one.” Hoookay.

So I became aware of this apparent “possession” when I would open the door to work on a meal and notice things were frozen on the fridge side – things that shouldn’t be, like lettuce, liquids or even eggs. I would look at the temperature dial and it would be on the coldest setting, and I would then ask hubby why he’d done that, whereupon he’d reply he hadn’t, and I’d say “well someone did” and we’d blame the cat that suddenly developed opposable digits. After about the 4th time this happened  and we took turns having fun blaming each other before we blamed the cat, we figured it was time to just kill the fridge and get a new one. We’d been thinking about this for some time already, and because we had a limited space to work in (without using a reciprocating saw and/or moving cabinets) the choices we had were limited, particularly since I had specific features I really wanted.

Looking online we found a scratch and dent in the model we wanted – a beautiful Samsung with French doors, the variable temp drawer and bottom freezer. It was in a town about 50 miles away and the salesman was kind enough to text photos to us of the scratches and dents, and we were confident our magnet collection would cover them, so we bought it and arranged for delivery.

It came on January 20, and I was SO excited. I had waited so LONG for the fridge. It was big, and sleek and gorgeous. Yes, it had some dings, but like I said, our magnets hid them, and we had it set up in no time. That evening we were getting everything organized and 24 hours later we had ice cubes from the dispenser. Life was good. I got it connected to the Samsung SmartThings app, which, among other things will alert you if your kids or spouse leaves the door open on the fridge.

On Monday, January 26 that’s when it all went to hell. The SmartThings app gave me an alert, telling me that the freezer compartment was too warm, and there was water on the floor, in the fridge, and the frozen veggies were melted. My first thought was an ice cube got stuck in the chute but then we realized the fridge was also warm. We tried to reset everything a few times without success and the next day called customer service at the store. They said they couldn’t come out until Friday, so we then called Samsung directly who said they would have someone there on Thursday. Well that guy tried everything, and couldn’t fix it. He set up ANOTHER call for the following Tuesday with another colleague to try replacing the compressor.

Keep in mind, it’s the end of January. In Minnesota. We are living out of 4 coolers in our garage. I know, I know, everyone is thinking “but it’s cold in Minnesota, right? So you don’t need ice for the coolers, that’s a good thing”. And you’d be right…except when it’s below zero and you have to go to the coolers MANY times a day for every little thing. Milk, ice cubes, butter, eggs, condiments. That good thing becomes a not so good thing really fast.

Tuesday comes, repair dude tries replacing the compressor and that doesn’t work. Now he’s getting concerned and calls Samsung to get permission to cut the lines open, which they do. I’ll bet most of you didn’t know that your refrigerator has some sort of system to dry the air in it and keep it fresh. Well it does, and our Samsung used silicone beads to do this. They are normally white or light gray in color, but when the guy cut the line and pulled out the container they were in, they looked like this:

5E82022F-6B6C-4AC6-BE65-C566A36D33C5

Yuck! Yeah, that’s not how they ought to look. That’s what happens when the fridge is tipped over on it’s side or back, and oil leaks and contaminates the entire system, and at that point your fridge is ruined. He sent a photo to Samsung, who agreed (in principle) it was toast. (One interesting thing that the repair guy did mention is that he sees this happen a lot with the units that come from Korea, not so much with the ones from Mexico, making him think it might be an issue on the cargo ships with loading or unloading.) Getting it formally approved for warranty replacement however, took about another 10 days and multiple phone calls.

Once that happened, I called the store we bought it from, got the store manager involved, and had to do some finagling to arrange for a replacement but eventually got that squared away as well. By the time we had agreed to have a new one sent out, it was February 10. Unfortunately the manager called me back a few hours later to tell me that they didn’t have it in the warehouse and it would need to be special ordered, which should take about a week. Fine.

A week goes by, and he calls again, full of apologies, because apparently 3 other folks have had issues with this fridge and also needed to replace it, and the damn thing is on BACK ORDER, and we have no idea when it will be in. He was also kind enough to be sensitive to how long we had already lived out of coolers, and said “this has gone on long enough, I’ve arranged to have a loaner refrigerator delivered to you.” A loaner? Who knew that was even a thing? That arrived about February 17, and we’ve been grateful ever since to have it.

So remember what I said about the replacement on backorder? I’m guessing it may need to come from Korea, and I really have no idea when it might happen, since we have this tiny little complication called coronavirus…

But we’ve got the loaner, and life is OK.

Update: I started writing this weeks ago, and realized I’d never posted it. Guess what? The new fridge arrives today!! Let’s hope it lasts longer than 6 days this time.

The Urge…to Purge

I got another wild hair recently, and I think it was inspired by potential future shame, which I decided I wanted to avoid. Over the past couple of months, we’ve been replacing our kitchen appliances, and are now (almost) down to just the stove. I say almost, because the misadventures of replacing our refrigerator are not yet complete – but that’s a whole separate post. I really want to replace the current electric stove with a gas stove, but that will require a bit of preparation, namely running a gas line through our crawl space and up into the kitchen. While we’re lucky enough to have someone that can help us with that, I knew something needed to be done about the crawl space when I realized I was almost hyperventilating every time I thought about our friend coming over to just give us the estimate.
So, the first step was to get inside and take stock of what needed to be done down there. It’s one thing to store your ‘treasures’ and know where they are so you can get to them when needed; it’s entirely another to view with a critical eye and ask yourself how you can reorganize them. As I did the latter, I realized there was going to be no reorganizing without some serious purging, and with that, the anxiety level shot up through the roof! How could I possibly part with that nasty, stained down pillow that doesn’t come clean? The things from high school I’ve saved for God only knows what reason. A cross stitch project that I started in high school, never finished but dang it, was still in its embroidery hoop (and probably has permanent creases in the fabric.) Funny thing about that one, is that while I have the directions to finishing it, I don’t have the color photo of how it’s supposed to look. I did find a picture of it on the internet though, perhaps I’ll print it out and see if I can find a family member who still does needlework. (Update on that, I learned last night my nephew does. Now if I can just convince him to finish it for me!)
After a few days of looking at what I’d been hanging on to down in that crawl space, I finally decided there was only one way out of the mess: I gave myself permission to have ZERO guilt about whatever I tossed out. None. Zip, zilch, de nada. Out went the pillows, some old frames, books, newspaper clippings, extra pots and pans, old Tupperware, and old blankets. I think I filled our garbage bin twice to overflowing. Then I resorted what was left, relabeled bins, moved a few things around and reorganized and suddenly it started to take shape. My husband got into it with me, and has been doing purging of his own as well, which has helped too as he got rid of old stereo cords, cable cords and wiring that we no longer will use.
The next step was to add shelving to the open wall studs on one side of the crawl space, to put small things there like the extra cans of paint we have from house projects as well as create a storage pantry. You know, for all the backup crap we HAD to buy to take us through COVID. The paint had been sitting on the floor of the furnace room, taking up space there, which was silly. Adding the shelves made so much sense, utilizing that space to store stuff out of the way.
It’s felt so amazing to get rid of this unused and unneeded stuff, so I’m really trying to apply the mentality to other rooms in our house too. Since we don’t have kids, it’s our nieces and nephews that will end up cleaning out this crap when we’re gone, and honestly, who wants THAT job? I can hear it now: “Aunt Beth kept what? THAT? Why?” or “What the heck was Uncle Mike thinking?” So, I figure if we can get on top of it now, it saves everyone a headache. (I can already hear my husband saying, “what do you care, you’ll be dead”, and he’s right, but there are some things I will always be concerned with, no matter what.)
For now, however, we declutter, lighten the load, get rid of old stuff that we aren’t using. I did stumble across a box that I hadn’t seen in ages, and opened it wondering what was inside and found an adorable set of tropical fish made of glass that are designed to be in a large vase or bowl of water. Some are attached to a base and a couple float. I have no idea where I got it, but it’s so pretty I’m can’t bear to toss it out. Otherwise if it’s broken, ratty or nasty, why keep it, and if it’s good and we don’t use it, maybe someone else will, so I also take plenty to Goodwill, or sell it on eBay or Craig’s List if it has value. And no, we aren’t going to make a fortune selling anything on eBay, I mean it’s not like we have an original Picasso hiding in the crawl space…or do we? I guess I’ll find out.

Update: I had a request for a photo of the fish. I wish there was a better bowl to display them in, but since we’re living under a “stay at home” order, and who really wants to go shopping now anyway, here’s what I’ve got.085A009F-5154-4CCD-AE48-93405417948A

Getting Old Will Cost Ya

In our house we have an aging problem. Things are starting to really not be as smooth as usual, getting more clunky, and making noises that are unexpected and less than delightful.
No, I’m not talking about hubby and I, and although I could be, I’m actually talking about our old appliances. About half of them were still original from when the house was built which meant we needed to have a plan for how we would replace them. It’s like I said to my husband one day, if the dishwasher goes, it’s kind of a pain, and if the microwave goes, it starts to hurt a bit more. If it’s the stove, well now we’re getting really serious and if it’s the refrigerator, well that’s a trip TODAY to buy something. So, we’d been looking, planning, saving and trying to decide what would be getting bought first based on what was giving us trouble, and what was annoying us most on any given day. About six weeks ago I finally couldn’t take it, and with early Black Friday sales upon us, talked him into a new dishwasher, and off to the appliance store we went to pick out a new dishwasher.

As we waited for our delivery day, something unexpected happened. I went to put something in the microwave one morning and heard a horrendous combination grinding/growling sound. One second later I flung the door open and turned it off. We fiddled with it a bit, tried again and got the same result. Back to the appliance store we went and our wonderful salesman, Dominic, chuckled and said “yep, cracked your magnetron tube. It’s cheaper to buy a new microwave than replace those.” So we picked out a new one of those, and added it to the dishwasher order. Remember what I said about it hurting a bit more if the microwave went out? Guess what…it hurts a lot! I never realized how much we’ve come to rely on it. Need soft butter in a hurry? Not happening. Want to have a quick cup of hot chocolate or tea? Nope. Reheat some leftovers? Yeah, that isn’t going to work either. Seriously, this thing that my family didn’t own 30 years ago, is something we can barely live without in 2019.

What really surprised me, however was what happened AFTER it arrived. Last time we bought appliances, which was only 3 years ago, we got wonderful manuals with them, chock full of “here’s what you have, how you use it, etc.” This time around our ‘user manual’ was 4 pages long, printed on cheap, thin paper. It barely told us more than “here is the on button”.  If you want to know anything about your appliances, you need to go to the company’s website and download the user manual, or find a scannable QR code. Which is all well and good but what about for folks that don’t have computers or internet? (And if you just said “what’s a QR code, well there may not be anything we can do for you.) I know, I know, there are a whole bunch of you out there that find it hard to believe there are people in these United States without computers and not connected to the internet, but in April of 2019, Pew Research Center analysis of survey data shows that as of April 2019

“10% of U.S. adults do not use the internet …and seniors are much more likely than younger adults to say they never go online. Although the share of non-internet users ages 65 and older has decreased by 7 percentage points since 2018, 27% still do not use the internet, compared with fewer than 10% of adults under the age of 65. Household income and education are also indicators of a person’s likelihood to be offline. Roughly three-in-ten adults with less than a high school education (29%) do not use the internet in 2019, compared with 35% in 2018… The research found that key reasons for not being on the internet were that a third of non-internet users (34%) did not go online because they had no interest in doing so or did not think the internet was relevant to their lives. Another 32% of non-users said the internet was too difficult to use, including 8% of this group who said they were “too old to learn.” Cost was also a barrier for some adults who were offline – 19% cited the expense of internet service or owning a computer.”

I know there’s going to come a time when the whole dang world is on the computer, but I can’t help but think that these manufacturers are jumping the gun just a tad.

Having said that, it sure is nice having a dishwasher that is so quiet I have to almost put my ear next to it to hear it running, and I love that the top panel on my microwave isn’t halfway to falling off anymore. Now if I can just keep the fridge and stove working for a while yet.

Things Mom Never Told You, Vol VI.

Reusing Razor Blades…

Have you ever used a single edged razor blade around the house for projects? I do all the time, from scraping my glass top stove to scraping paint off woodwork, and in the past I’ve used a razor until it seems dull, then tucked it into the plastic container it came in, on the “dispose” side until it was full and then tossed it. But I got to thinking, “isn’t that a waste? Can’t I sharpen them?” Guess what, it turns out you can! IMG_2542
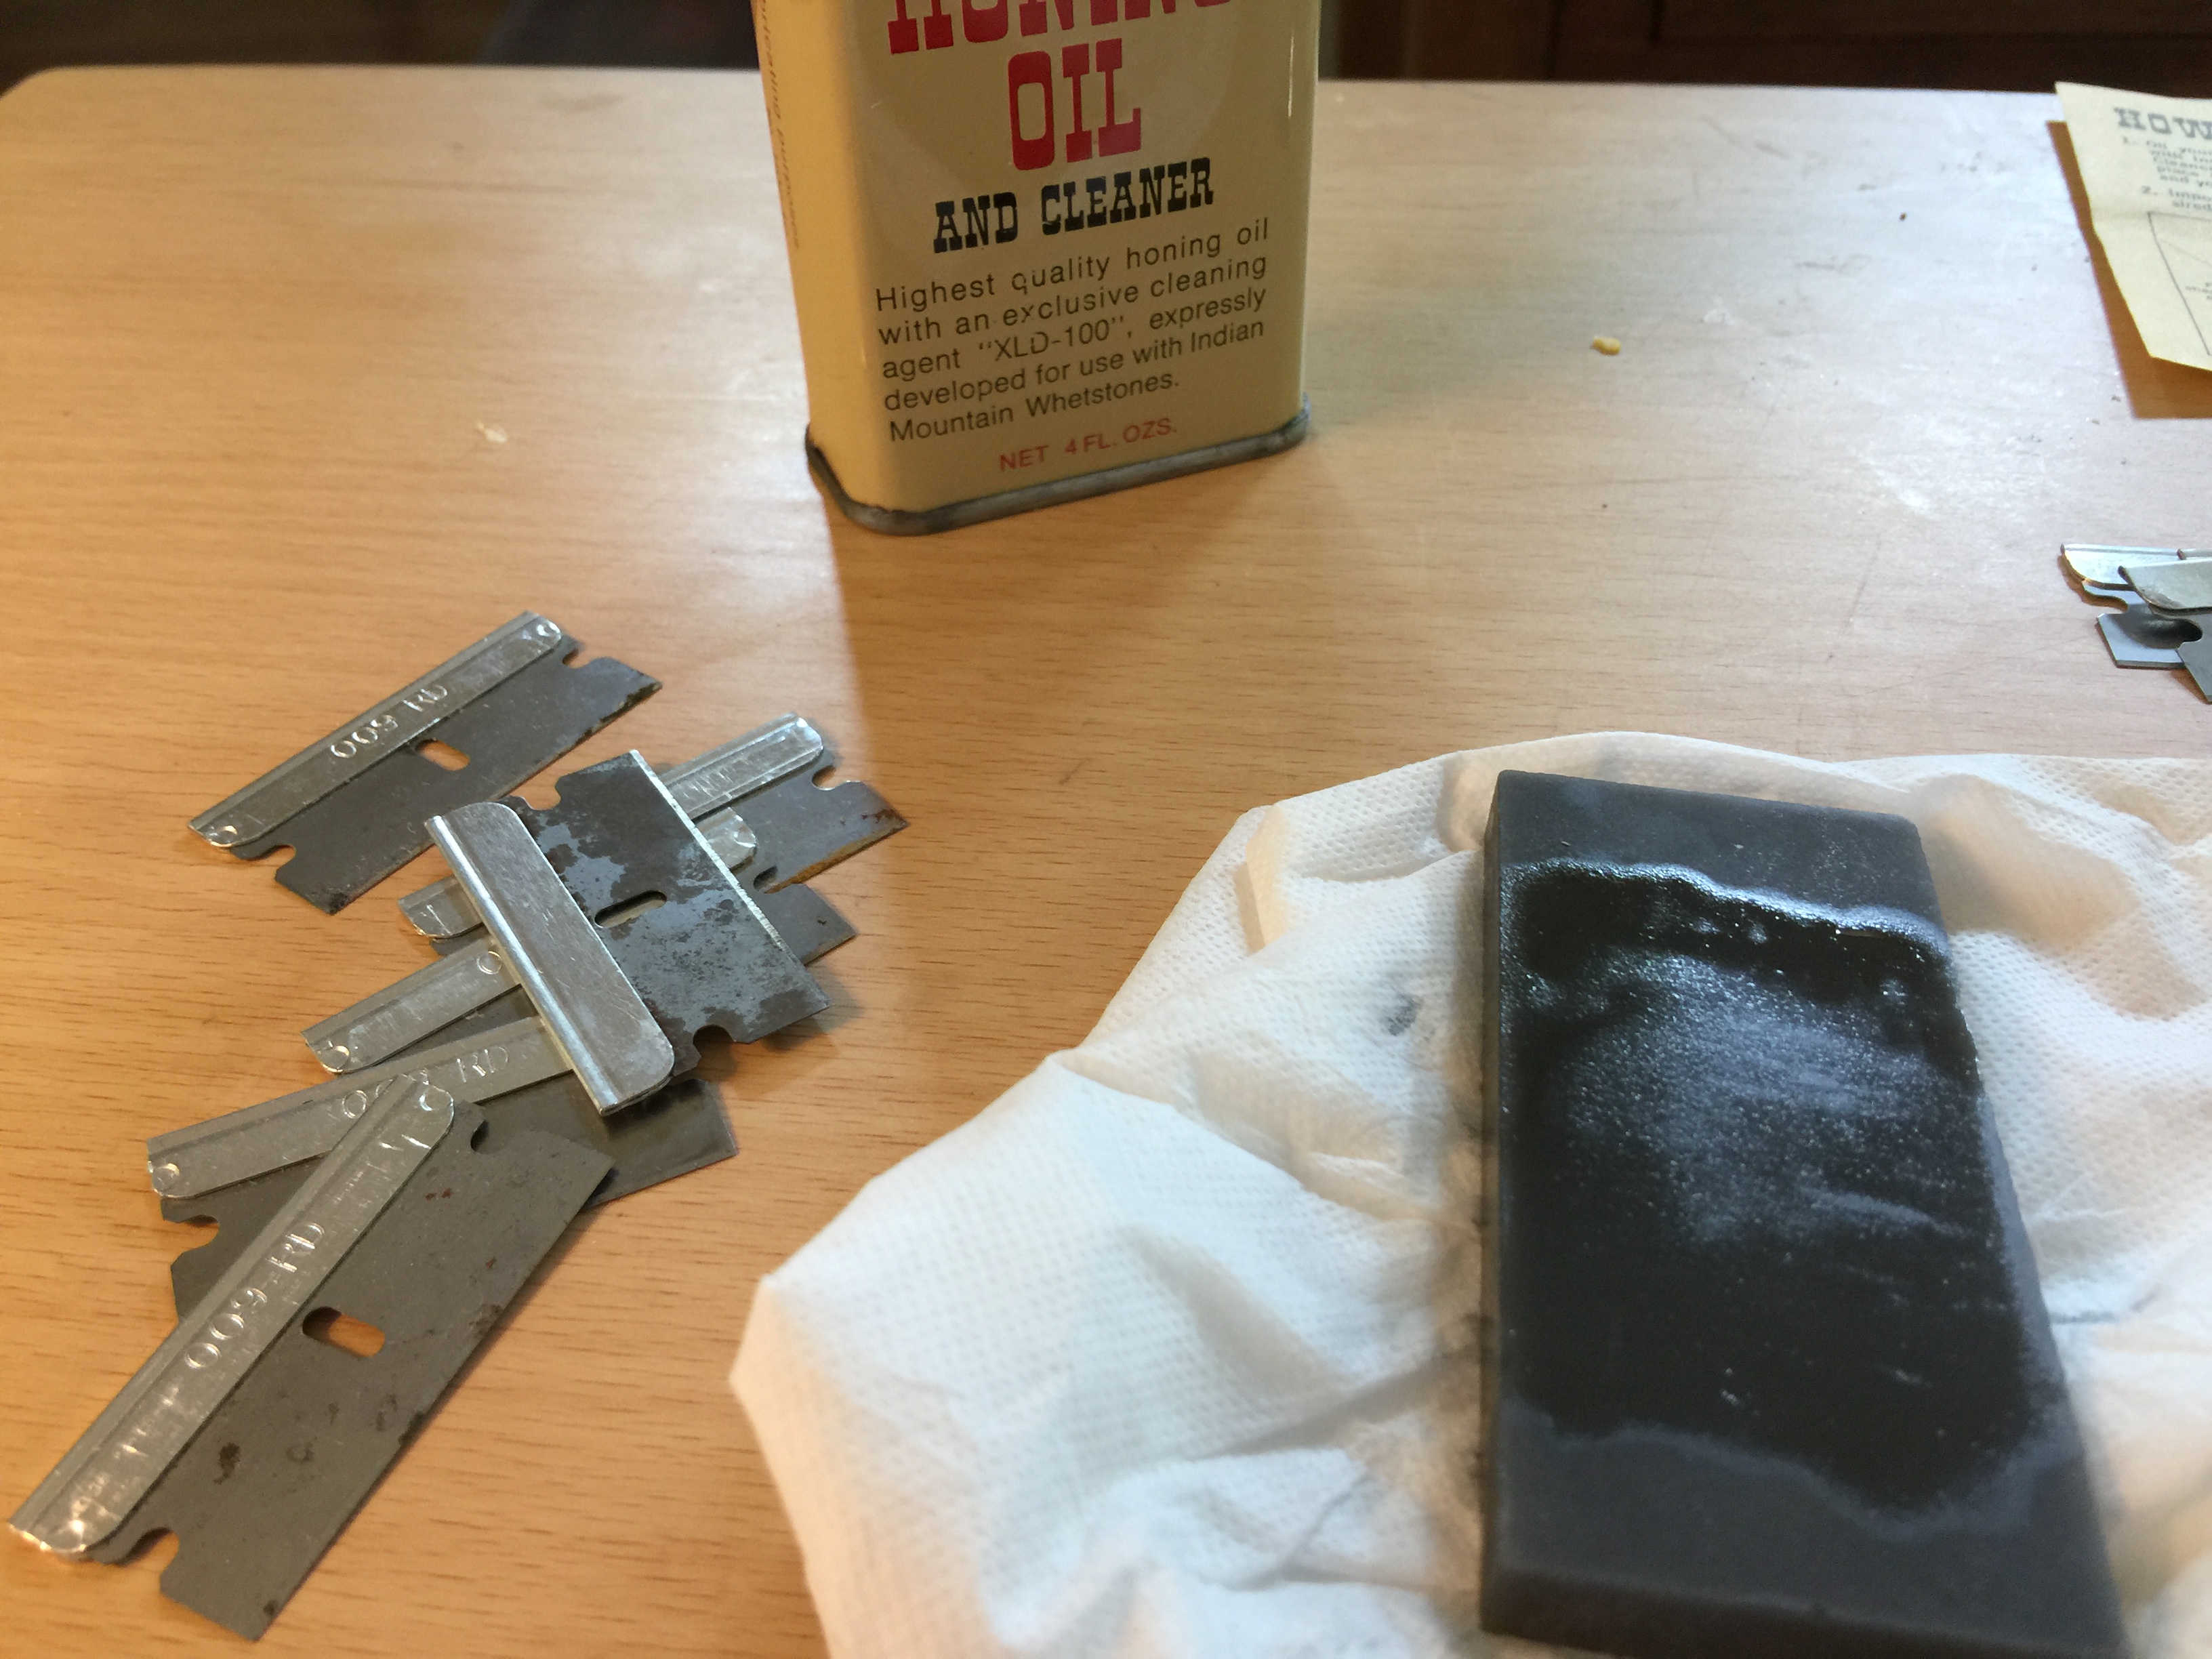
Get a blade sharpening kit, or if you already have a whetstone then get honing oil. You can see in the photo to the left, my whetstone with oil on it after I had sharpened a few blades along with my razor blade collection. (I managed to pull them back out of the plastic container with a tweezers. Carefully.)

After putting some oil on the stone I took the blade, and swirled it on the stone in the oil a bit, then held the blade at about a 20-30 degree angle, and pulled it backwards against the stone.IMG_2543 
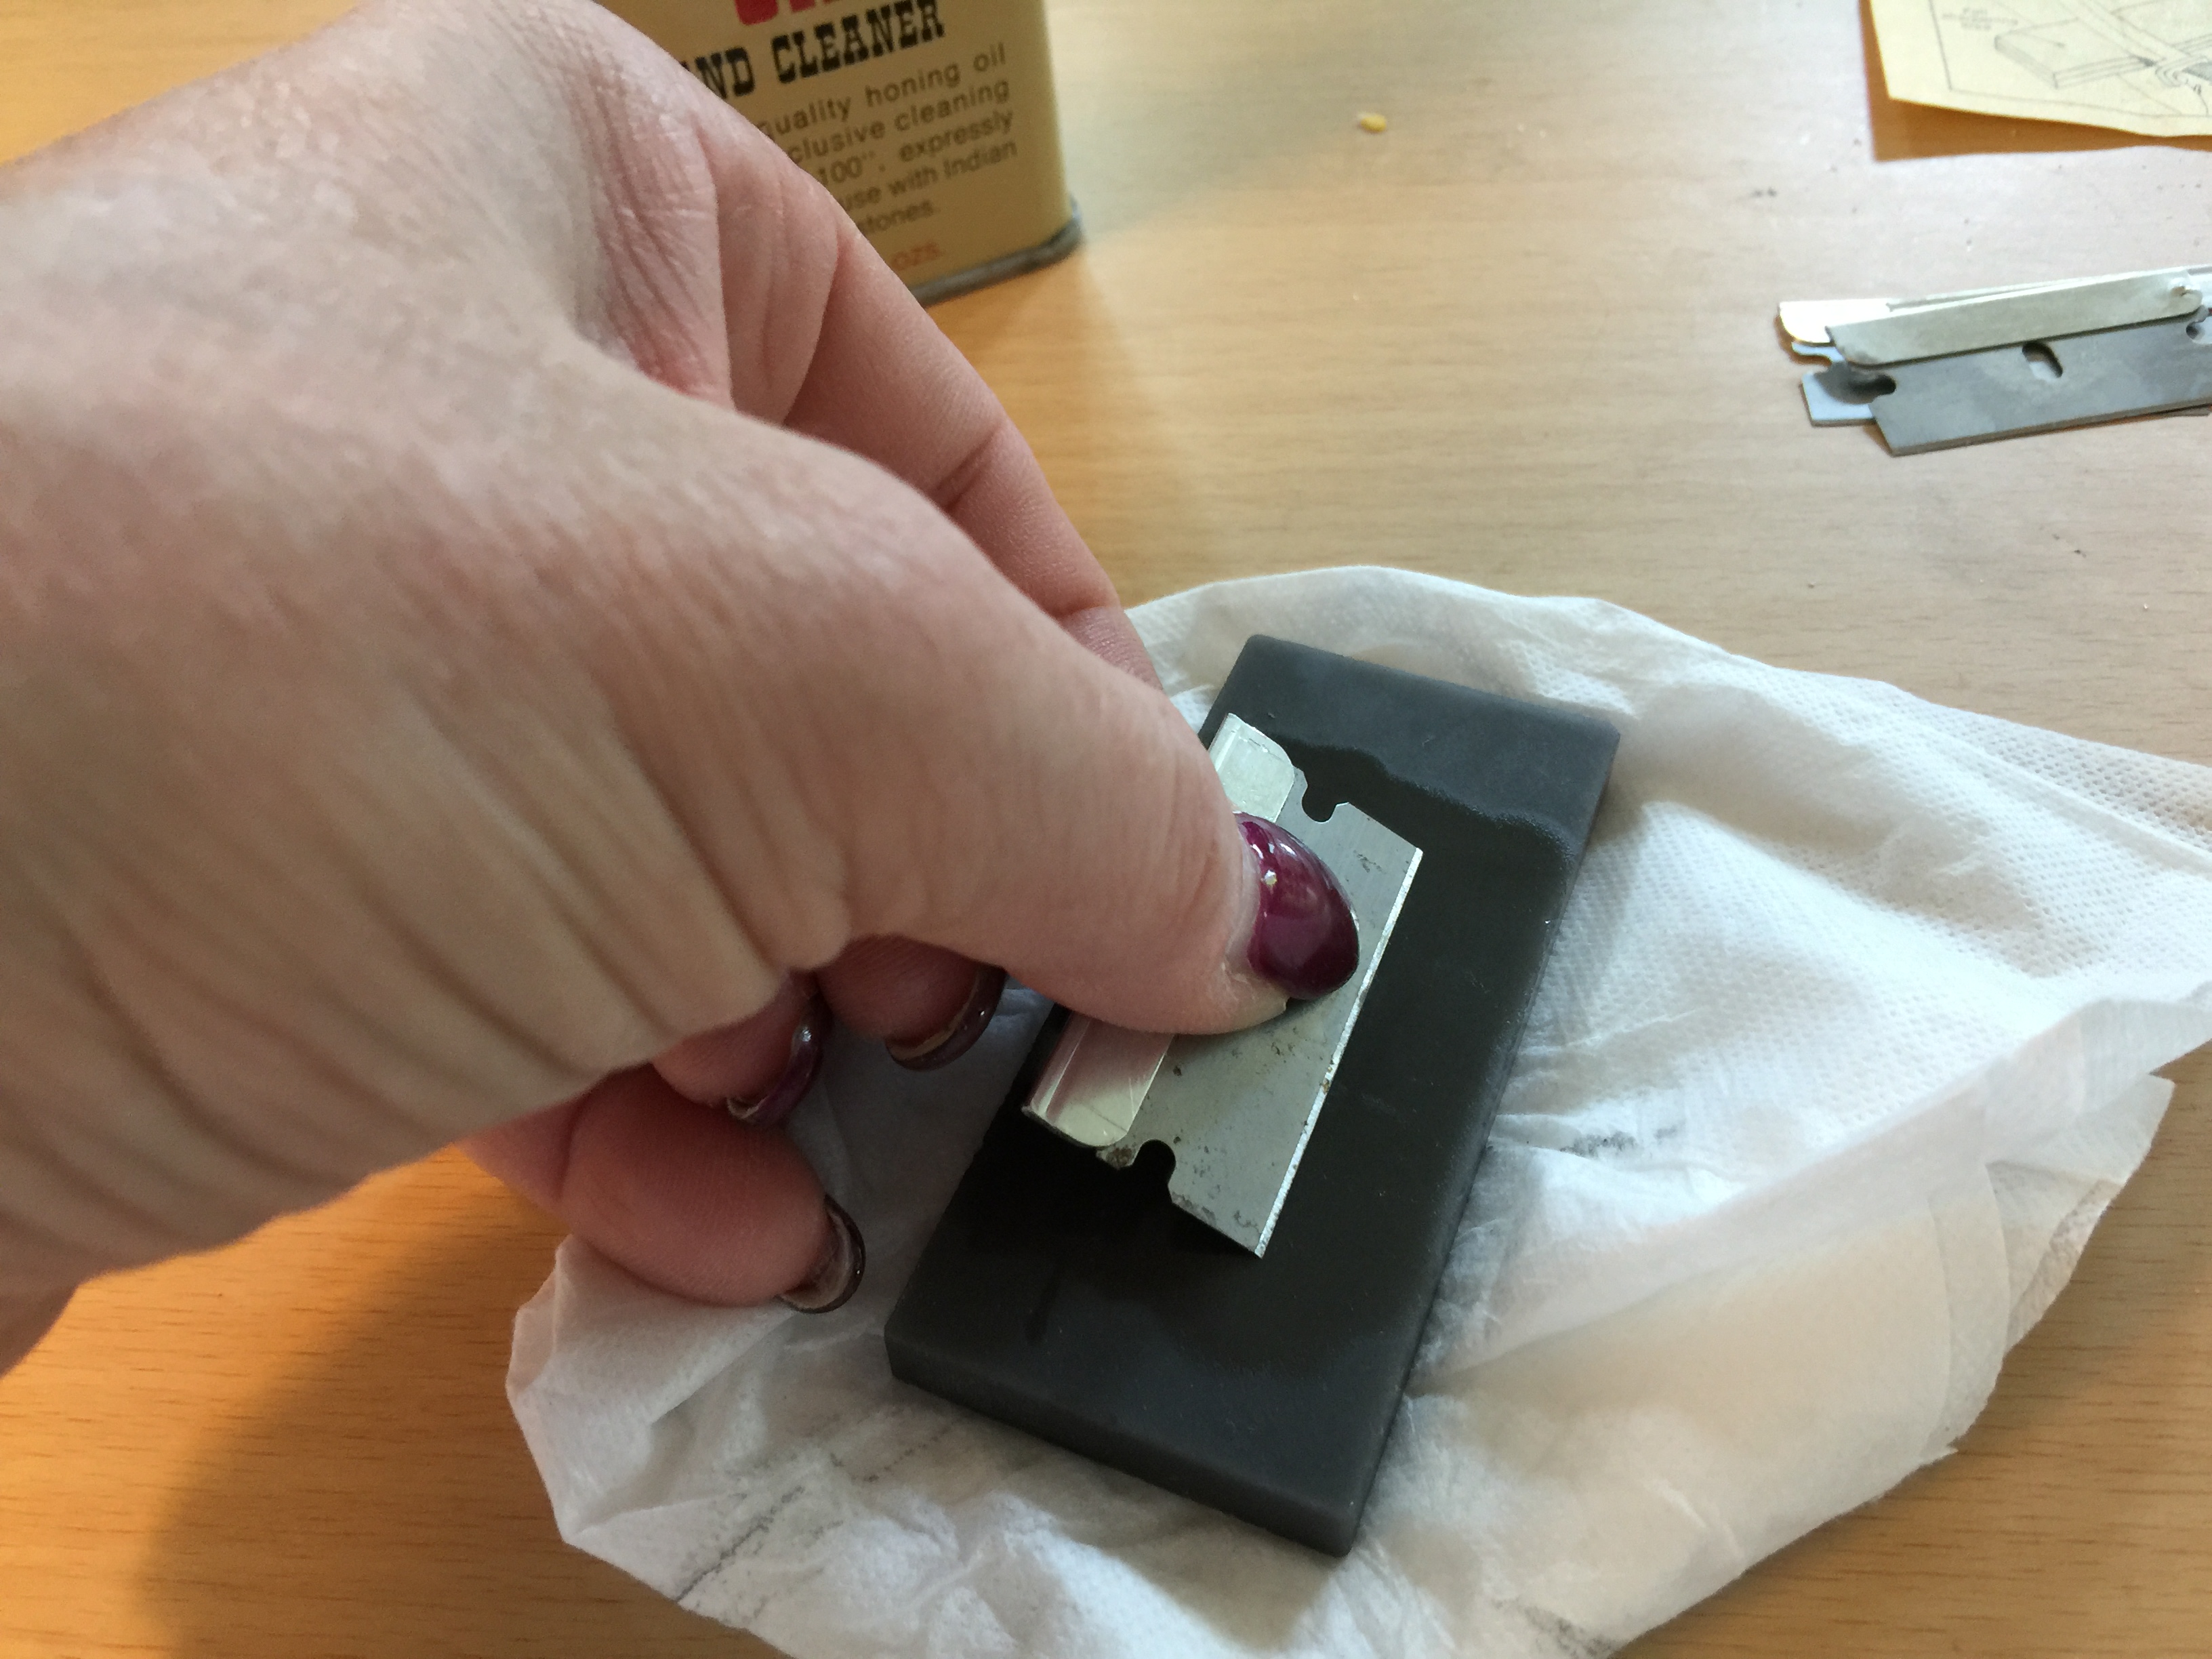
In the photo to the right, that would be pulling the blade from right to left. I did that on each side about 6-8 times, then wiped off the oil and  tested it by pulling it against the edge of a piece of paper. After all were sharpened, I put them back in the storage container, and labeled it so I knew they were sharpened but not new.  Now I’m all set with 14 freshly sharpened blades, and all it took was a kit we already had, and maybe 30 minutes to do all of them. And if you’re really in a rush, you can just pull them against some sandpaper. I used some 100 grit, that worked pretty well too.

Sparkling Porcelain…

Ever wondered how to get stains out of the toilet bowl, especially those under the rim? Pumice stones are apparently an insider trick of the housecleaning trade, according to the folks at Real Simple Magazine, who compiled a great list of 12 Things Only Professional Cleaners Know.  I’ve been using these for a while now, and they really do get the nasty stains out of the bowl, making it sparkling white again. Just make sure you get the stone wet first, or you can scratch the bowl. The article has some other really helpful tricks, well worth a read.

Winter Over Plants…

If you’re like me, you have plants that move from outside to inside over the winter, and of course that means a big adjustment for those poor plants in terms of available sunlight. Even if you have plants that stay inside year round, as we move through the months into winter, there is less available sunlight, and plants can get starved for sun (and really, who can’t, for the love of Pete, which is a different issue that can be solved with a plane ticket to Key West, but I digress). After a few weeks, plants can start to look pretty pathetic. An easy solution is to get grow lights for them, and the ones that are out now are so much better than the old ones that we used to use. Back in the day we used to get cool and warm fluorescent lights, which would cover the spectrum of light wavelengths needed to best simulate sunlight. Then they came up with a bulb that was in the shape of a floodlamp that was specifically for plants and had the right spectrum in one bulb. You can still get the floodlamp bulb in an LED style, which is really great and saves money, but even better you can now get one in a regular light bulb shape, which, if you’re geeky like me is known as an E26. There are a number of different brands, Feit is the one I have, which is what I’ve shown here with the green base.

fullsizeoutput_9bfd

You can see it looks like a regular light bulb, which is nice if you have some sort of directional light like one that clamps on, that you can put it into and aim it at the plant.


fullsizeoutput_9bfe


I took a picture of the bulb from the top (not quite centered, hence it looks slightly skewed) so you can see how they get the spectrum of both cool and warm light covered. It’s amazing what a difference it makes on my plants, and I can even keep my hibiscus blooming most of the winter with this. Add in a timer, and you’re good to go!


My promise: I will never share something with you that I haven’t personally tried. I won’t tell you it works if I can’t prove it. Where possible I will share photos or a video. If something is an epic fail, well I’ll tell you that too as I think that is just as valuable, even if I end up looking ridiculous doing it.

Things Mom Never Told You, Vol V

How to Keep Patio/Deck Plants Looking Fantastic All Summer…

Are you like me in that you absolutely LOVE having plants outside on your deck or patio in the summer time, but hate the chore of having to water them every day? My patio is my oasis from life, I have Adirondak chairs and side tables that are painted cheerful colors, and everything is done to give me a tropical, “down island” feel for those few months out of the year we have summer. Having lush, well-watered plants for me is a must, and in the beginning of the summer it’s fun, but honestly by August, it’s a chore. IMG_3638 (1).jpg

The solution was to install a drip irrigation system, which sounds difficult, but really isn’t at all. I purchased my initial setup from Proven Winners, although there are others out there including the DIG system I found at Home Depot, which is what I’ve supplemented with. Here is a link to a video about the Proven Winners system, and you can purchase directly from them as well.  The customer service staff at Proven Winners are incredibly helpful and have a really fast response time. I’ve had emails answered within a day and sometimes the same day. The DIG website has a wealth of information as well, take a look at it too.

The way the system works, is that you have a coupler consisting of a backflow valve and adapter, that reduces the water pressure from your system down, and then the drip tubing connects to that. You then run the drip tubing around to where you want for your plants. You cut the tubing and insert a coupler to branch off tubing to extend it. They have “T” shaped couplers if you want to just have a single extension off, and “X” shaped if you want to have 2 extensions plus continuing your run. There are also different drip heads as well, depending on your needs. You can bury the tubing in dirt or under rock to hide it, run it behind objects, etc.

For the past several years I’ve put a brass “Y” splitter on our outdoor spigot, which allows us to have our hose still connected and then the drip irrigation on the other side of the “Y”. On that side I connect an automatic watering timer. For our patio I use a 2-zone timer, so I can run two separate sets of tubing. One set goes one direction, to the flowers, and the other set goes the other way, to the tomatoes and a few other flowers. That allows me to set two separate sets of times and frequencies. This year I also ran tubing through PVC pipe that I buried in the grass between the landscaped area off the patio, and out to a landscaped area further into the yard where I have a few potted plants. Then I know they get watered on the days our sprinkler doesn’t run. Depending on how many plants my patio ends up having, I may end up getting a 4 zone timer, as I’m not sure how many times I can branch off the tubing before I lose water pressure.

Pros and Cons of The Two I’ve Used

Pros: What I like about Proven Winners’ system is that the tubing is softer and more flexible than the DIG tubing I found at Home Depot. That allows me to disconnect it from the connectors and watering ends each year so I can change up the configuration every year. Another thing that I really like about PW, and I mentioned this above, is their customer service. I had a small problem this year with a part, and emailed them one evening about it, telling them what the issue was, and how I had tried to troubleshoot it, asking what else I could try. A few hours later (at 11 pm!) I had a response, which was basically “sounds like you have a broken part, I checked your order history and will send you a new one tomorrow at no cost.” Am I going to keep going back to them? You bet I am!

A couple of nice things about DIG is that it’s readily available from Home Depot, and they do have a bigger variety of drip heads available. So if I’m in the middle of set up and run out, or if I find that some of mine are no longer working I can just run up there and get new ones. I don’t have to order them online and wait, and is a bit more cost effective.

Cons: The tubing from Proven Winners so far only comes in white and tan, while the tubing from DIG comes in brown and black. IMG_1341Our patio is stained a terra cotta color, so both white and tan tubing show up VERY well, as you can see. I did talk to the nice folks at Proven Winners and even sent them this picture of our patio with white tubing showing, letting them know that not everyone has white concrete patios and could they perhaps get brown tubing? They said they would mention it to their vendor, but so far their website still has only the white and tan.

Another con, and this is a biggie for me, is that the tubing from DIG is very rigid and inflexible, and much more difficult to remove it from the connectors. So if I want to change configuration I have to boil water, and put the connection in the water for several seconds to make the tubing very pliable and I can then pull it off. If it starts to cool down, it won’t come off.  At that point I have to go back in the house and reheat the water, or cut the tubing off the connector and then take a utility knife and cut away the small amount of tubing that is still on the connector to start over. I’m either wasting additional time or money. I sometimes have to use warm water to soften the connections from Proven Winners to get the tubing off, but the water can cool down a lot more before I have to reheat it, so I have a lot more working time with it first, and I find I don’t always have to do that. Sometimes I can just pull connections apart. However, do that too often and the Proven Winners tubing will stretch out at the connection, leaving you with a leak.

Overall, it’s a toss up. I like Proven Winners tubing better, but DIG has more watering end options and I really like that, plus their brochure is really informative. I do wish I had known about a drip irrigation system years ago, and if you’ve never tried one before, give it a shot. They really are easy to set up, and you’ll wonder how the heck you lived without one this long. Let me know if you have questions about setting one up, or your success using one.

My promise: I will never share something with you that I haven’t personally tried. I won’t tell you it works if I can’t prove it. Where possible I will share photos or a video. If something is an epic fail, well I’ll tell you that too as I think that is just as valuable, even if I end up looking ridiculous doing it.

Giving Thanks

This is such a strange time of year. Many of us sit at a table, surrounded by family members we’re obligated to spend time with but don’t really want to see, we try to make nice for a few hours and pray to God no one brings up politics while we stuff our faces with way too much food, alcohol and goodies. And pie. Pumpkin, pecan, mincemeat, pumpkin, lemon meringue. Oh, and did I mention pumpkin pie?

Screen Shot 2017-11-23 at 6.44.15 AM

This year is different for me, for a number of reasons. I’ve been out of work for 5 months now, looking faithfully every week for something that suits my skills and career path. It hasn’t been easy, not being able to find something, and I’m sure as difficult as it’s been for me, it’s likely been even harder for my husband. So as I think about what I am thankful for, he really is first on my list: he’s my rock, a source of quiet strength and support at all times. He pushes me to be my best in everything, but knows when to let me be. I’m thankful that we were wise enough to have money tucked away so that I can not worry (ok I worry, but at an appropriate level) about our finances during this time. Yes, we’ve cut way back on spending, and the list of things we need or want to get when I get a job is growing ever longer, but that’s ok. I’m thankful we have a home that isn’t in need of major repair, that we replaced the furnace a couple of years ago now that the temperature is dropping into the teens here. I’m thankful that we’re both healthy, that we have enough to keep us busy in and around the house when I’m not job hunting. I’m thankful for the fact that I can not only make Christmas gifts for friends and family, but that I have enough craft things in my home already to do it, and don’t need to buy much of anything so we’ll be able to have a very affordable Christmas this year.

I’m also thankful for so many other things around me. As the news of David Cassidy’s death broke on the news services, and I was immediately saddened and thought  for the first time, “we’re old!” But I’m so thankful for the joy he gave all of us young girls as teens, and that we got to have him in our life for a time, however remotely. Come on, admit it. You know you had his poster on your bedroom wall back then. I’ll admit it, but we were so young and silly and and young pre-teens and teens just thought he was so dreamy. I found an article yesterday on CNN that is worth a quick read that is a hoot, with a few facts about him we never knew. Take the time to read it, if you were a fan it will make you smile.

I’m thankful for my friends, who listen when I need them to, and who are just there to make me laugh, or hang out, or allow me to reciprocate for them in kind.

Speaking of my friends, I am especially thankful for some new ones this year I didn’t even know that I had. When I was laid off 5 months ago along with the rest of the team I worked with, I was just getting to know the team I’d worked with for only 4 months. We were all telecommuters, and worked from coast to coast, and were on different projects, so we didn’t all interact with each other every day. That meant after 4 months I was still just barely getting to know some of the team. After we were all let go, a group of 5 of us started group texting. It’s become a sometime support group, a virtual happy hour, and a wonderful sisterhood. So I am so grateful for Salpy, Jamie, Kathy and Blair, I don’t know what I would have done without you wonderful women.  Along with them, my friend Morissa, who has also been an uexpected source of support and assistance that I never saw coming. Along with all my other fantastic friends who listen, guide and help me look for jobs, I wish you joy and blessings this Thanksgiving.

What are you especially thankful for this year?


Things Mom Never Told You, Vol 1

From time to time I find these little helps referred to as “lifehacks” by many, a term my husband detests. I’ve put a couple of them together to share with you, and over time as I come across more I will keep doing so. I want to make you all a promise right out of the gate – I will never share something with you that I haven’t personally tried. I won’t tell you it works if I can’t prove it. Where possible I will share photos or a video. If something is an epic fail, well I’ll tell you that too as I think that is just as valuable. So with that, I bring you the inaugural edition of “Things Mom Never Told You”.

Have you ever wondered…

…What to do with old toothbrushes?

Bet you always wondered what to do with a) your old nasty squished toothbrush or b) the free toothbrush you get from the dentist that you don’t like/use because you have an electric one. Well stash em all over your house, because they’re amazing cleaning tools. They’ll get the dust out of little crevices on your appliances, in grout and corners, in windows, in your car. Firm bristles scrub well too, and aren’t just for getting light cleaning done. We have them everywhere! I’ll even wrap a sanitizing wipe around one for some of the cleaning, like when I’m cleaning the caulk around the sink to get into the tiny crevices.

…New use for old flannel sheets

I cut mine up into small pieces, and I’ve used some as dusting rags or glasses cleaners as they don’t give off lint, others for wrapping up delicate items before packing away like china or other breakables. If you cut off the edges that have the elastic on the bottom sheets you can use those too. They also work well for staining and painting rags.

…Breathe new life into old plastic flower pots (or other plastic stuff)

Get a large bucket that you don’t mind ruining. I use a Homer bucket – you know the ones I’m talking about, from Home Depot, the big orange project buckets. You’ll also want plastic or latex gloves you can wreck, just get a cheap pair of the dishwashing kind. Next select 2 (or more) colors of spray paint that you like and want to have together on an object. Finally, choose the item you want to work with for this project. For this project I picked a plastic flower pot.

IMG_1287I’m doing this one with the color it is, which is the mock terra cotta, but I’ve also done it by first spray painting it with white primer so that my base was white. IMG_1288

You can also see this pot wasn’t new to start with, and was pretty sun bleached and dirty. I did scrub it up with some simple green but you don’t need a new one, just a well cleaned object.


Step 1. Fill up your bucket with cold water, deep enough to fully submerge the item. Take the bucket outside and put it on the ground, either in the grass, or on something that protects the area underneath it.

Step 2: Set up some method for drying the item you’re going to cover. You may want to hang it to drip dry, if possible. I have several large “S” shaped hangers that were originally used to suspend birdhouses or birdfeeders from trees, and I now use them as hangers from trees to spraypaint items or as my dryers. If you don’t have a way to suspend outside, you can hang the item from a garage track with something underneath, or even inside as long as you have something underneath to catch drips.

Step 3: Take your spray paint and spray on the surface of the water, alternating colors. You can spray in concentric circles, or vary it up. Do a bunch of concentric circles, then start a new set next to that. You’ll need quite a bit on the water’s surface though. (I know, in your mind you’re thinking “that much?” Sorry I can’t be more specific. It’s a learning process.) After you spray on what you think you need (add more for good measure), take a popsicle stick or tooth pick and with the tip lightly pull a bit through the paint, so you’re creating a bit of a pattern on the surface. You don’t need to do much, and if you try to do too much you’ll get paint sticking to the stick and start pulling it out of the water.

Step 4: Put on your gloves, then pick up your item and SLOWLY immerse it into the water. I recommend starting with the top of your item, so if you run out of paint, and have to respray and resubmerge it will be toward the bottom of it, not the top. For the first time, however, dunk the item all the way under water and hold it there for about 30 seconds, which helps the paint to start setting up and harden.

Step 5: Remove it from the water, hang it up and let it drip dry. Voila! You have a crazy new painted pot!IMG_1745

IMG_1245Here are a couple of other things that I’ve done as well. The table was originally black, we then spray painted it a light blue. I decided to try the two colors but it was too big for the bucket.

IMG_1209

In a flash of inspiration (and sheer stubbornness because my husband didn’t think I would be able to find anything large enough to dunk it in), I lined our wheelbarrow with plastic and then filled that with water, and took the table apart into two pieces, dipping those separately.


IMG_1259The shell was a plain white/cream. I did that in a magenta/pale pink to accent in our bathroom. In hindsight the pale pink barely shows through, it almost looks like it’s the white, so I could have selected a different color for more of an accent. Don’t get me wrong, I like it, and can tell the difference between the pink and the white, it’s just subtle.


…Remove Old Stain

OK I admit this one isn’t something most of us run across too often, but the need we had and product we found for the job was such a revelation that I have to show it to you. We had an old aluminum canoe that was under a deck when the deck was restained, so the canoe had oil-based stain that dripped onto it. We didn’t notice it right away…or even later…we saw it probably a year later. Ugh. Fast forward to about 18 months later when some friends asked if they could borrow the canoe. Now it’s not a new canoe, it’s probably 30-40 years old, and has gotten banged around on rocks a fair bit, so it’s scratched, dinged etc. But stain? So I did a little research and found on something called Motsenbacher’s Lift-Off #4, Spray Paint and Graffitti Remover. It doesn’t dissolve the paint, it breaks the chemical bonds between the paint and the surface it’s on. Here are some initial before and after shots:

IMG_9498

fullsizeoutput_92cd

In the top photo I had already started to remove stain when I realized I’d better get a posterity photo so I quick shot one, hence the little gap on that middle spike. On the bottom photo you can see the left spike of stain is gone. I literally sprayed on the Lift-Off, waited 2 minutes, then used a plastic scraper (like the ones you get from Pampered Chef) and just a tiny bit of elbow grease to get it started. Once it started to come off, it truly peeled off. Once my husband saw how well it worked he said he’d finish it up, then decided he would also give the canoe a good overall scrubbing. Here is how it looks now:IMG_1424.JPG

Crazy, aint it? I linked to a YouTube video on the product name above so you can learn more about it if you would like.


I hope you found this fun, informative and/or helpful. Volume 2  is already underway, packed full of more great tidbits!    

A Trip to the Twilight Zone

Several years ago, my husband brought a proposal for a trip to witness an event to my attention, and at the time I really didn’t think he was all that serious about it. Fast forward to a few months ago when he brought up the topic again, and it was readily apparent to me I’d significantly underestimated his interest in this event, so we began planning how we might be able to be among those who watched the 2017 Solar Eclipse, and in August we took a road trip down to Columbia, Missouri for the big show. We are terribly fortunate, my husband’s brother and his wife live there, so we were able to stay with them, and his nieces were in the process of moving from Florida to Jefferson City which is about 30 minutes south of Columbia. One was there already and was gracious enough to let us stay with her for the first two nights in spite of the fact that she didn’t even have towels or pillows unpacked yet, items we were happy enough to bring along. (Thanks Mary!!)

The trip down was mostly good, up until the last half hour before Jefferson City, when we hit a heck of a rain storm. Suddenly our long drive got even longer, when hubby had to slow WAY down just to see the road. Fortunately that didn’t last terribly long, and after winding our way on a curvy, hilly road in the dark, we got to Joanna and Mary’s house, a couple of weary travelers stumbling out of the car and into an unexpected wall of warm humidity. Yeah, that wasn’t planned for at all, after all that time in an air conditioned car and we were instantly dripping wet. Fortunately his nieces’ house had AC, so we were quite comfy inside. What we didn’t realize is that Missouri is known for it’s humidity, and the air conditioners go on May 1, and don’t go off until the end of October. The other thing we didn’t know, is that there are armadillos in Missouri…yep, you read that correctly, armadillos. We saw a couple of dead ones on the road, and fortunately other drivers hit them, not us, as I’ve heard they can do some awful damage to your car. I guess it’s because they have this weird startle reflex causing them to jump straight up in the air…so when cars drive over them, they jump up, and that lovely armored shell causes all kinds of damage to the undercarriages of cars. Ugh.

Sunday morning we headed up to Columbia, where we had the unique experience of attending church where my husband’s brother is the pastor. It’s not an ordinary church, but rather is an international church on the campus of Baptist University. There were attendees from a number of different countries and cultures there, so his brother is kind of acting as a missionary right here in the United States. His wife teaches Sunday School to the children, and she said it can be really interesting as some of the children don’t speak any English at all. She finds she has to be creative, and uses lots of crafts to teach the kids. Look out on glitter Sundays!

Monday dawned, and was the big event. We set up our lawn chairs and waited, then watched in dismay as hazy clouds started to fill the sky. Apparently this isn’t an unusual phenomenon with eclipses, as the moon begins to cross in front of the sun and the temperature drops, it causes clouds to form. So on top of the partly cloudy sky we already had, we got more haze blocking our view. We did get to experience and see the eclipse, and while it wasn’t nearly as good as some parts of the country, I can’t really fuss because back home in Minnesota, I understand it rained all day and where they were hoping for a partial, they got nothing so I really shouldn’t whine.

The experience – now that was something else. While I can’t say the four of us were moved to tears or were overwhelmed, like some folks seem to have been, it certainly was an awesome and amazing sight. IMG_9633
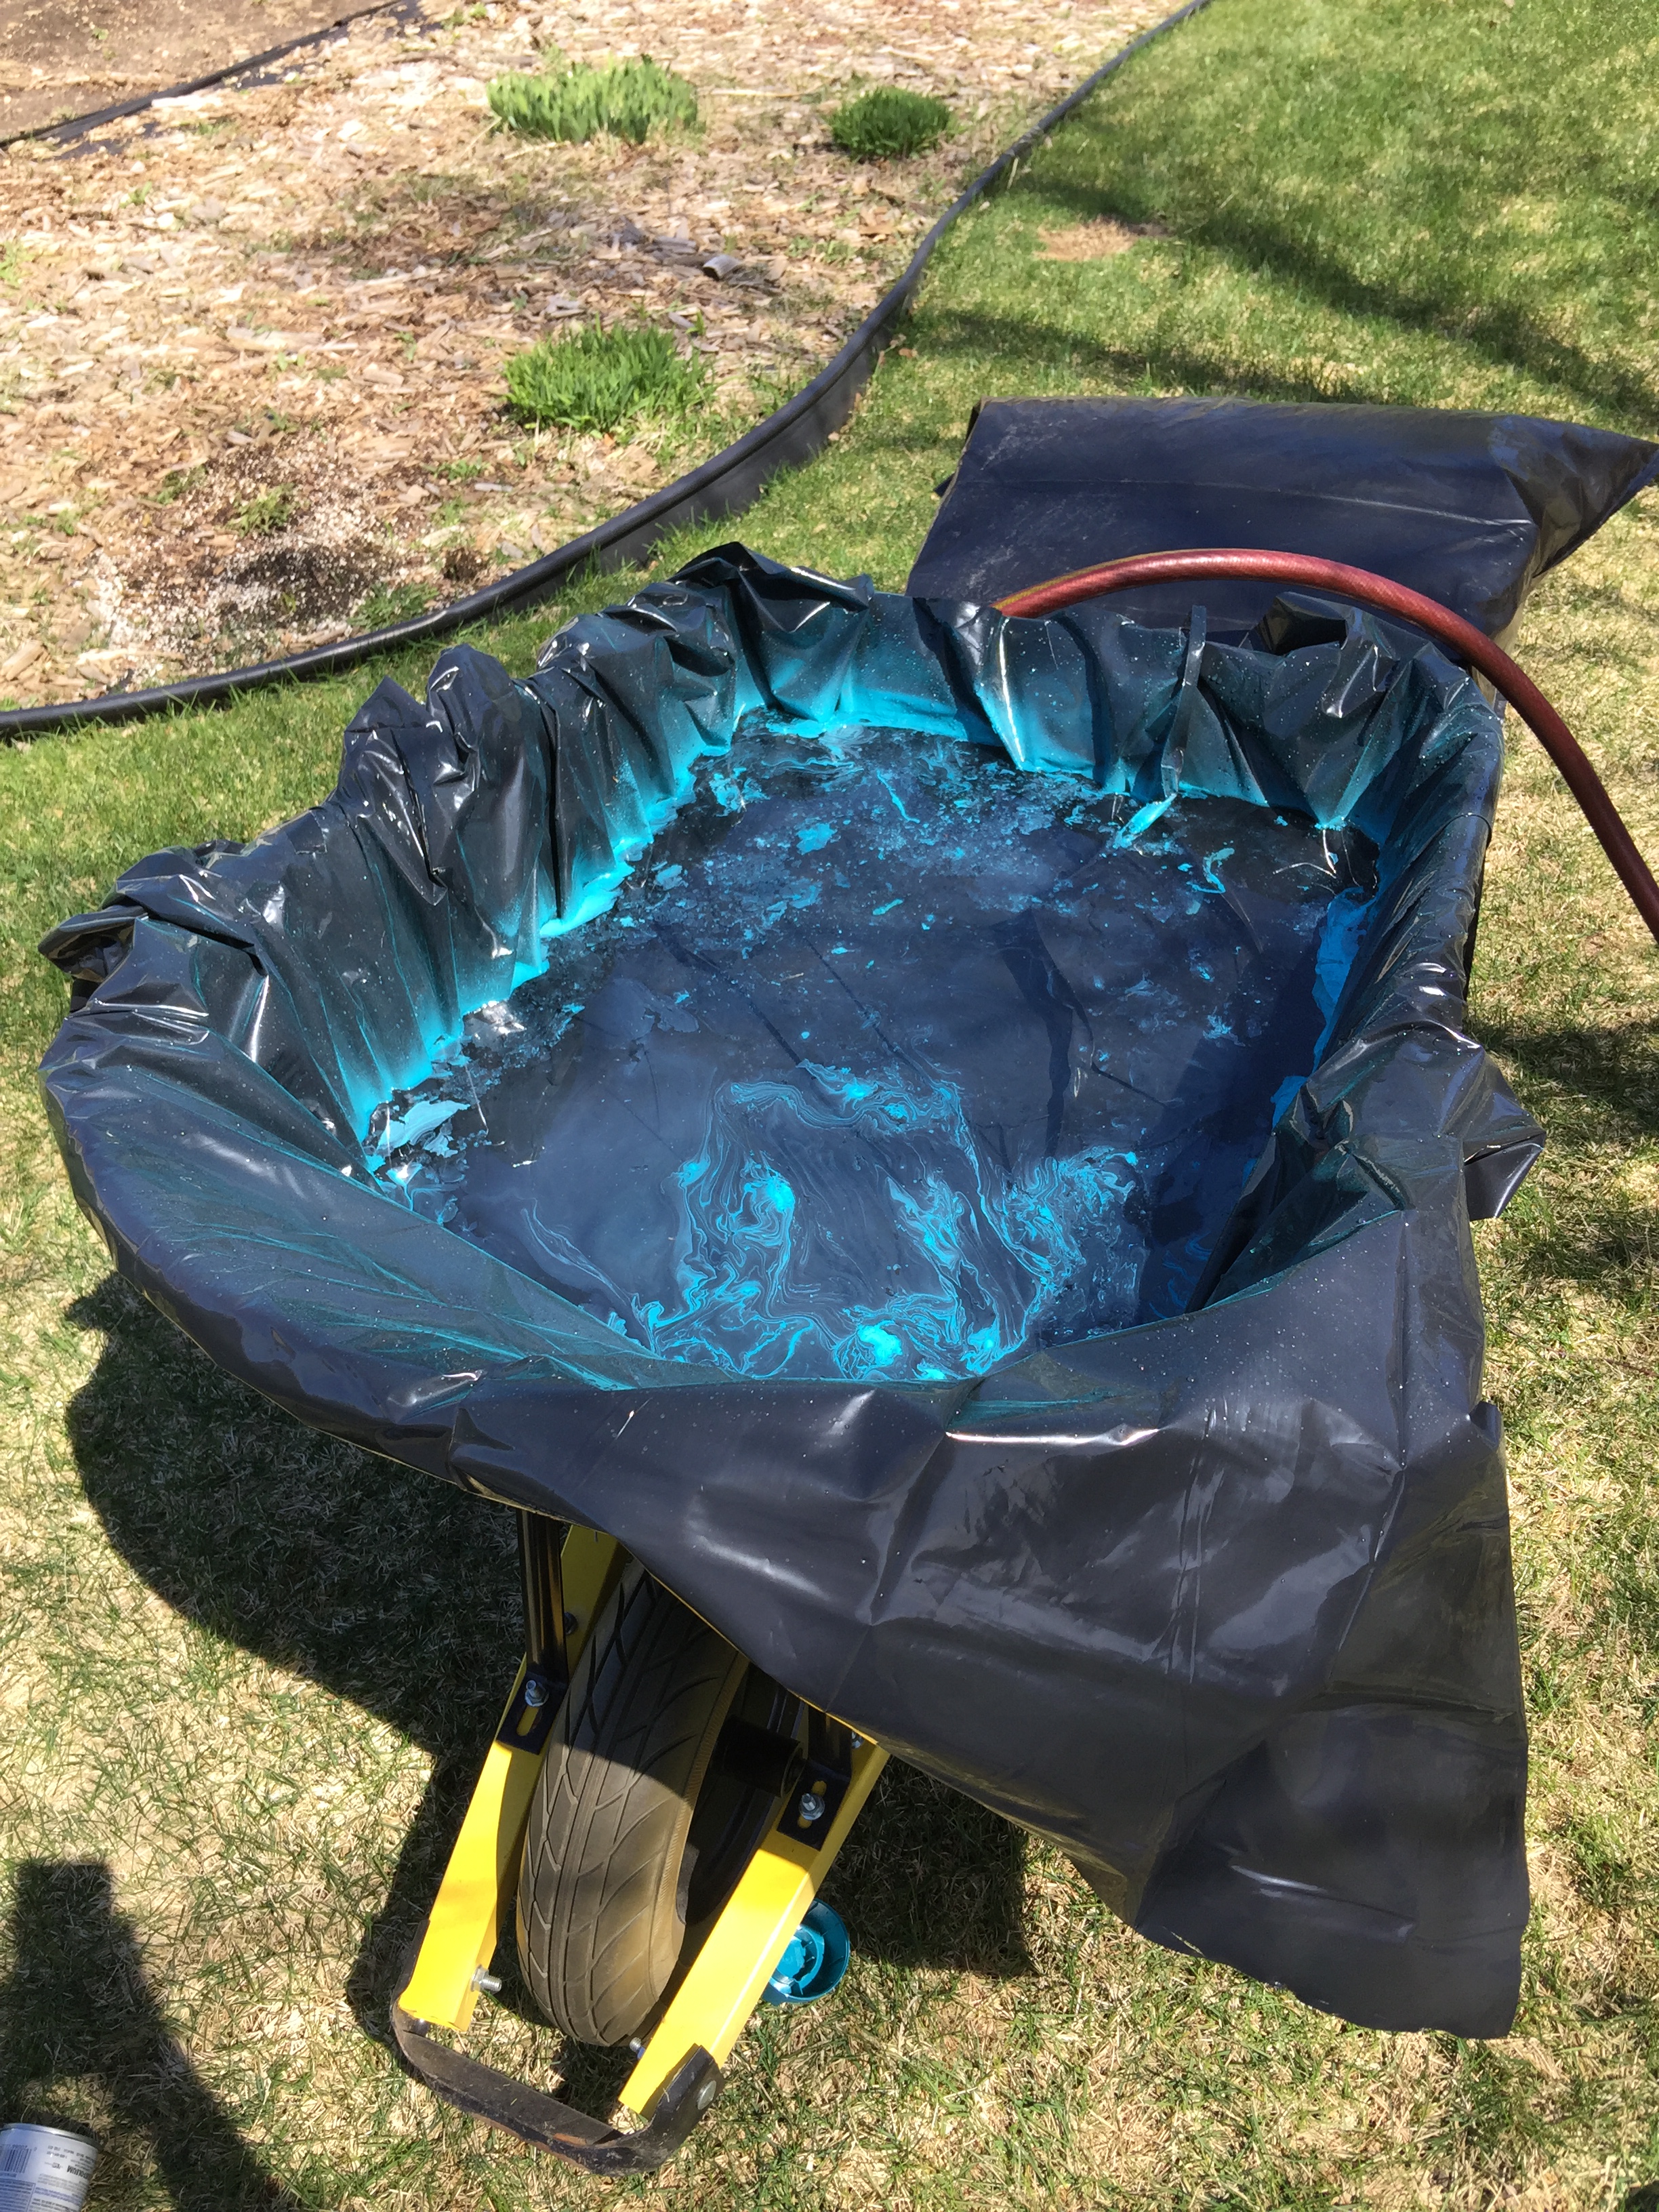
Perhaps if the sky had been clear it would have been different for us, but the sun/moon were periodically disappearing and reappearing behind clouds, so we had less than the 2 min of viewing the corona that a lot of others got. (I want a do-over!) It was beautiful, eerie, and kind of otherworldly. My husband and I took some photos that unfortunately were also a bit on the hazy side. The thing that was weird though, is that it got dark out, but not as dark as I thought it would. IMG_9651
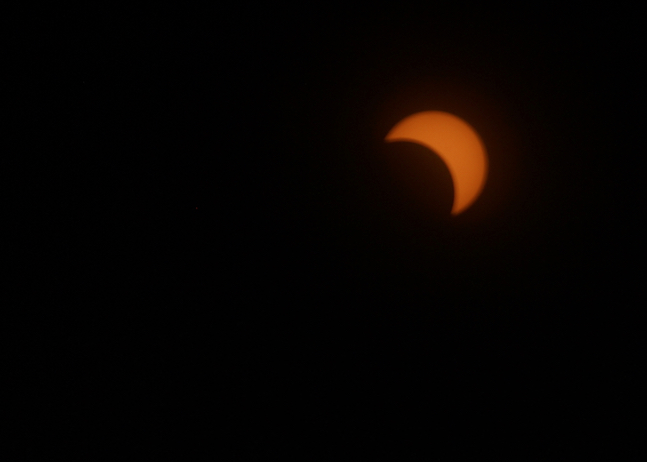
The light that remained literally made you feel like you were in the Twilight Zone, and then all of a sudden it was done, the sun peeked out, warmth came back and the haze disappeared.
We also got a few photos on the “exit” side. You’ll note that the sun looks orange, which is more from the color of the filter covering the lens of the camera than anything.

So would I travel again to see an eclipse? You’d better believe it! They happen about every 18 months somewhere in the world. There are total, annular and partial eclipses. I’d never heard of an annular eclipse before and had to look that one up. That’s when there is a ring of the sun that is still visible, where the moon isn’t quite covering all of the sun. In that case you can’t remove the protective glasses at all. It’s like having a “ring of fire” in the sky. I think that would be interesting, but not nearly as much fun as a total eclipse. So who knows, maybe we’ll plan some around the world vacations around the coming total eclipses. There are a couple that go over Australia, and I’ve always wanted to go there. Can you imagine what a trip that would be? Dive the great barrier reef, visit New Zealand AND see a total eclipse? Truly a trip of a lifetime for us. Have you gone anywhere that you considered your “trip of a lifetime”? I’d love to hear about it in the comments.