Belly Up to a Body Bar


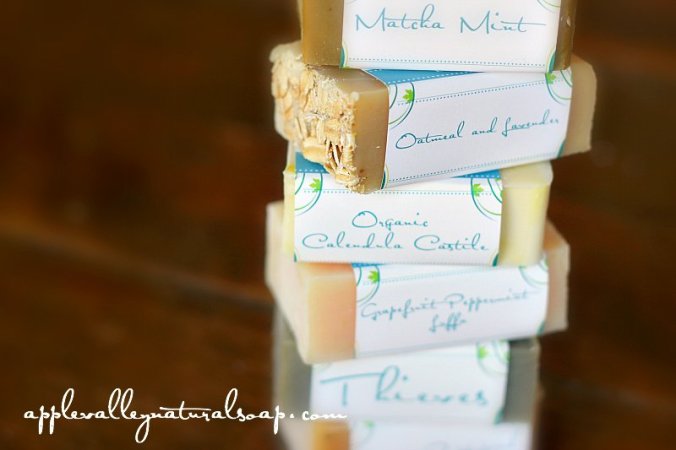
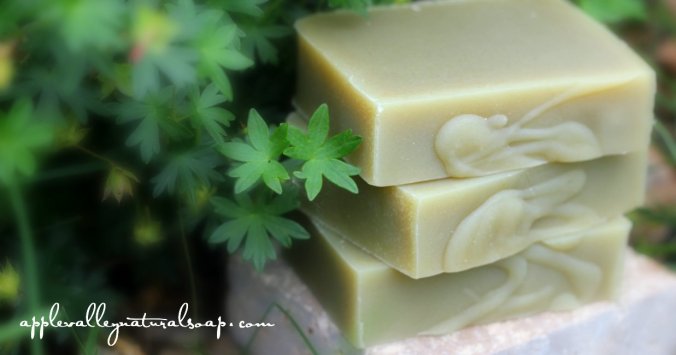
Several weeks ago I told you about shampoo bars from Apple Valley Natural Soap. Well I’ve also started using their body bars, and love those as well. My skin hasn’t felt this clean, soft and moisturized in ages and it never feels like there is any residual on my skin. My favorite (so far) is the Coconut Soap Bar. It lathers up really well, which is important to me as I shave in the shower and find it difficult to do that if a soap doesn’t lather well but this bar is amazing. It doesn’t have much of a scent, which is fine, I’m happier with the sudsing. There are also shaving specific bars for men.  It also seems like the bars last a long time. My husband and I are both using the bar, and I had really expected we’d have gone through it by now, but there is a lot left, and we started with only a half bar!  While their regular items are great, they also have items that are seasonal but be aware that seasonal means “when they’re gone, they’re gone.” I’ve just ordered some winter bars with extra moisturizers in them, which most of us that live in the midwest are desperate for this time of year.  The other bar that I love is their Kitchen Salt and Spice Bar. This is fantastic for washing your hands after you’ve worked with onions or garlic to get the smell off. I keep it next to the sink on a soap mat so that it doesn’t get all mushy. (Those little soap mats are fantastic too, I have 2 in the shower!)

I also recently ordered Vanilla Tangerine whipped body butter, and oh my God. I can’t decide if I like this more because it makes my skin feel awesome, or for how it smells. When I first put it on, I could swear I smelled chocolate and my husband thought it smelled like fresh cookies. After I looked at the ingredients again, I realized I was smelling the cocoa butter and thought, yeah, that’s what’s making me want to lick my arm. Repeatedly. It’s like a slice of heaven in winter, and I just ordered a second tub of it. Their Shea Butter is great too, although it’s different than the body butter. I am using that more on my hands to try to keep winter dry skin at bay. It’s more like a semi-solid but softens up with the warmth of your skin.

The company works hard at being eco friendly and sustainable. Their packaging reflects that – my cousin ordered some liquid Castile hand soap (that smelled unbelievable), and it came in the most unique packaging, made out of bamboo and sugarcane pulp. It’s 98% biodegradable, according to their site. I have also ordered a Christmas edition of the liquid hand soap, and if you’re a fan of foaming soap they say right on the site you can dilute their soap to work in foaming dispensers. The other thing that is unique about them is that so far for me, at least, each order has come with a small sample of a soap. So far each one has been unique, and has been something I haven’t already tried. I don’t know if that’s coincidence or careful planning and smart marketing, but from what I have been able to pick up about Marianne so far I’ll go with careful planning and smart marketing.

This is a great site on which to do some Christmas shopping. They’re great at making sure if something is out of stock they apply a banner stating that and some things are but there are lots of things in stock. I wouldn’t suggest waiting too long or the limited edition/seasonal offerings will be gone.  If you go to the section for gifts you can also purchase a gift box and you’re shopping is done! Order now and avoid the Christmas rush, and also ensure that it will arrive well in advance of Christmas. Plus get some goodies for yourself…you deserve to be pampered, and this is a fine way to do it. Curl up with a book, a cup of cocoa after you’ve slathered body butter over yourself and bask in the scents.


Advertisement

A New Way to ‘Poo…Shampoo That Is!

Several years ago, I attended a silent auction/fundraiser for my niece’s sorority. They did a brunch every year, a kind of mother-daughter event with invitations extended to friends, close relatives, etc. I remember one year the speaker was a classmate of hers, a very young woman who had been diagnosed with breast cancer. Her talk was informative, educating us on the BRCA2 gene, as well as some surprising risk factors. One of those risk factors was something called Parabens, which are commonly found in things like shampoo, conditioner, liquid soaps, etc. While I paid attention to her, I also didn’t make any changes to my personal care routines.

About 6 weeks ago I was reading some random articles and found an interesting one that has made me rethink my choices about personal care, initially for a different reason. The article was about using shampoo bars, and why they make so much more sense than traditional shampoo. First, traditional shampoo is primarily water, and second, it’s packaged in a plastic container. So, you’re paying for something you don’t need, and getting it in a package you need to throw away (or preferably recycle, but realistically, most people don’t do that.) I started thinking about it, and figured what the heck, why not try it. The speech from my niece’s classmate came back to me, and since we have some rare cancers in my family I thought it would be smart from the perspective of my health.  I was really lucky to discover that one of the companies featured in the article is not only local for me, but 15 minutes from my home.

Apple Valley Natural Soaps has a wonderful variety of shampoo bars, body bars, lotions, rinses, and other natural care products. They also have an informative blog to help you understand the products and how to select the right one, their philosophy of caring for yourself with natural products, and a great business model. After doing some research, I dove in. I ordered several different samples of shampoo bars ($3 each) and a soap mat (use one of these for your soap so the water drains off and doesn’t make your bar all mushy) and started using them.

Do you remember the last time your hair was actually squeaky clean? I didn’t, but from the first time I used their bar, my hair squeaked. Literally, squeaked. It took a couple of times of washing for my hair to settle in but it’s at the point now where I have minimal tangling in the shower, or afterwards. I don’t use a traditional conditioner anymore either, just their acidic rinse once a week. That’s all. My hair is so crazy soft. Why I waited so long to change to shampoo bars is beyond me. Now my biggest problem is picking out the right bar. (One thing to be aware of, these shampoo bars don’t work unless you have soft water, and I definitely noticed a difference in sudsing when our softener salt was low.)header 7

One of the things I love about this company is that it’s doing well enough to have a great variety of products, but is small enough that the owner, Marianne Buck is involved and hands-on with all parts of the business. Last week I sent her an email with a recommendation for an addition to the information about her shampoo bars, and a few hours later she had not only responded but said she liked the idea and would work on implementing it. And if you live in the Minneapolis/St. Paul area, she offers local pick up so that you can save on shipping. Their turn around time is quick too, which is nice. They’re also very customer centric – after I placed my order, I realized I’d selected the wrong shampoo bar, and as I prepared to email her about it, I got the email that my order was ready. I sent Marianne an email anyhow and asked if she would be willing to change out the bar, and she replied that she was more than willing to do that. I had also let her know when I ordered that I was getting the Camping bar for my husband, as he was preparing for a camping trip, so could I have it by a certain date? She filled my order in plenty of time for me to get it for him to bring along.

I don’t know about you, but companies with outstanding customer service are rare, and Apple Valley Natural Soap definitely is one of those. In the interest of full disclosure, I did sign up to be an affiliate with them, but only because I really love these products, if you hadn’t figured that out already. If you’ve thought about trying a shampoo bar but weren’t sure if it was something you’d like, give this company a try. All of the reviews I’ve read have been outstanding. Buy some sample bars to try them out and see what you think. Click here to go to the site. I’d love to hear if you try out their products and what you think.


Logo

The Urge…to Purge

I got another wild hair recently, and I think it was inspired by potential future shame, which I decided I wanted to avoid. Over the past couple of months, we’ve been replacing our kitchen appliances, and are now (almost) down to just the stove. I say almost, because the misadventures of replacing our refrigerator are not yet complete – but that’s a whole separate post. I really want to replace the current electric stove with a gas stove, but that will require a bit of preparation, namely running a gas line through our crawl space and up into the kitchen. While we’re lucky enough to have someone that can help us with that, I knew something needed to be done about the crawl space when I realized I was almost hyperventilating every time I thought about our friend coming over to just give us the estimate.
So, the first step was to get inside and take stock of what needed to be done down there. It’s one thing to store your ‘treasures’ and know where they are so you can get to them when needed; it’s entirely another to view with a critical eye and ask yourself how you can reorganize them. As I did the latter, I realized there was going to be no reorganizing without some serious purging, and with that, the anxiety level shot up through the roof! How could I possibly part with that nasty, stained down pillow that doesn’t come clean? The things from high school I’ve saved for God only knows what reason. A cross stitch project that I started in high school, never finished but dang it, was still in its embroidery hoop (and probably has permanent creases in the fabric.) Funny thing about that one, is that while I have the directions to finishing it, I don’t have the color photo of how it’s supposed to look. I did find a picture of it on the internet though, perhaps I’ll print it out and see if I can find a family member who still does needlework. (Update on that, I learned last night my nephew does. Now if I can just convince him to finish it for me!)
After a few days of looking at what I’d been hanging on to down in that crawl space, I finally decided there was only one way out of the mess: I gave myself permission to have ZERO guilt about whatever I tossed out. None. Zip, zilch, de nada. Out went the pillows, some old frames, books, newspaper clippings, extra pots and pans, old Tupperware, and old blankets. I think I filled our garbage bin twice to overflowing. Then I resorted what was left, relabeled bins, moved a few things around and reorganized and suddenly it started to take shape. My husband got into it with me, and has been doing purging of his own as well, which has helped too as he got rid of old stereo cords, cable cords and wiring that we no longer will use.
The next step was to add shelving to the open wall studs on one side of the crawl space, to put small things there like the extra cans of paint we have from house projects as well as create a storage pantry. You know, for all the backup crap we HAD to buy to take us through COVID. The paint had been sitting on the floor of the furnace room, taking up space there, which was silly. Adding the shelves made so much sense, utilizing that space to store stuff out of the way.
It’s felt so amazing to get rid of this unused and unneeded stuff, so I’m really trying to apply the mentality to other rooms in our house too. Since we don’t have kids, it’s our nieces and nephews that will end up cleaning out this crap when we’re gone, and honestly, who wants THAT job? I can hear it now: “Aunt Beth kept what? THAT? Why?” or “What the heck was Uncle Mike thinking?” So, I figure if we can get on top of it now, it saves everyone a headache. (I can already hear my husband saying, “what do you care, you’ll be dead”, and he’s right, but there are some things I will always be concerned with, no matter what.)
For now, however, we declutter, lighten the load, get rid of old stuff that we aren’t using. I did stumble across a box that I hadn’t seen in ages, and opened it wondering what was inside and found an adorable set of tropical fish made of glass that are designed to be in a large vase or bowl of water. Some are attached to a base and a couple float. I have no idea where I got it, but it’s so pretty I’m can’t bear to toss it out. Otherwise if it’s broken, ratty or nasty, why keep it, and if it’s good and we don’t use it, maybe someone else will, so I also take plenty to Goodwill, or sell it on eBay or Craig’s List if it has value. And no, we aren’t going to make a fortune selling anything on eBay, I mean it’s not like we have an original Picasso hiding in the crawl space…or do we? I guess I’ll find out.

Update: I had a request for a photo of the fish. I wish there was a better bowl to display them in, but since we’re living under a “stay at home” order, and who really wants to go shopping now anyway, here’s what I’ve got.085A009F-5154-4CCD-AE48-93405417948A

Reading and Chasing Squirrels

I’m a voracious reader, always have been. Just ask my mom, she’ll happily tell you about any number of occasions where she had to call my name multiple times to get my nose out of a book and do my chores when I was a kid, and I can honestly say all these years later, not much has changed. Sometimes I read fast, sometimes I go slowly, savoring every word. Recently, I read something written in a style that I’d not tried before, and wow, what an experience it was.

For Christmas this year, I told my husband I wanted “Pioneer Girl”, which is an autobiography of Laura Ingalls Wilder edited by Pamela Smith Hill, and more specifically, it’s an annotated autobiography. Having never read something annotated before, I didn’t really understand what precisely, that meant.

Now, I’m rather curious and inquisitive by nature. I love learning things, solving puzzles, and am quite certain that I was a child that said “why” far too many times and probably drove my mother crazy. You’d think that reading something annotated would be right up my alley, right? Well yes – and no, and I’ll tell you why.

If you’ve never cracked open a book that is annotated, I’ll tell you what makes it unique. Rather than having the footnotes at the end of the book, they are included throughout the entire text, so that the reader has the additional information about that particular thing that has a notation attached to it, right when you’re reading it. This is good, in that you have the benefit of more context at that moment in time. It’s also bad, because if you’re like me, it can be a little distracting, like when you’re trying to look for a butterfly, and then suddenly I yell “squirrel!!” and all of a sudden, I’m off down the proverbial rabbit trail. Here’s a great example.

One morning I started reading about the family’s move back to De Smet, SD, in 1879. As I saw some maps and photos, I got to wondering how different it looked today as compared to then, and what might still be around, because of course I wasn’t just content to read the book and annotations. Nope, I had to ALSO open Google maps, pull up De Smet on the map, put it in satellite view and start zooming in, then put the little yellow man on the streets and walk around. I had to zoom out again and find the Big Slough, Silver Lake, find out where the Ingalls homestead was, was anything still there? Where was Almanzo’s homestead, is there a marker there? Zoom in, zoom out, fiddle around. Search Google for historical De Smet photos, find ones from the period, was Pa Ingalls store on there? Is it still around? Good grief!!

I’ve done the same thing with other historical places. I think it’s wonderful to be able to find these old photos on the internet, and see what used to be, and how things have changed. I even caught myself doing it again yesterday when we finished watching a wonderful documentary from Ken Burns on the Great Plains in the time of the dust bowl. In the show was narration from a book written by Caroline Henderson, who had purchased land and homesteaded in the early 1900’s before she married (what a woman!). She then married, and she and her husband lived on that land and farmed in the heart of the dust bowl, and she wrote about life during that time. Of course, at the end of the documentary, there I am on Google maps, searching for the Henderson homestead in Oklahoma. Yes, it’s still there but unfortunately, it’s just far enough off main roads that the Google camera hasn’t photographed it.

Did you also know that you can get a “what was there” view using Google Earth Pro? It won’t work with regular Google Maps, you need to use the Google Earth Pro app. Once you find an address, you can use the imagery date slider bar to go back in time to see earlier satellite images of the area. Or course, the older they are, the poorer the imagery is because they didn’t have high resolution satellite photography years ago. You also can’t drop the little yellow Google guy on the street for a street view of yesteryear – it will change to a street view of the most current year’s image. But it’s still fun. I’ve also gotten lost in our state historical society’s online photographic collection, Facebook’s Old Minneapolis page, and a site called Minnesota Reflections. I find that as I dig around one site, I will stumble on something else, and then another and another and suddenly I’ve killed an entire morning, my eyes are blurry from staring at the computer screen and I can’t feel my rear end because I’ve sat for too long. But dang, I sure had fun!

Selling on eBay, or How to Make Some Pocket Change

About a year ago, I was looking at some of the stuff we had laying around the house that didn’t sell after a garage sale. I was thinking to myself what a metric crap-ton of work holding a garage sale is, and surely there must be an easier way to get rid of stuff and still make money at it, when it dawned on me…

 Screen Shot 2018-12-21 at 8.42.20 AM.png


I started doing a bit of research, and since then have sold quite a few things on the site. I didn’t find a lot of helpful info on eBay’s site, nor did I stumble on a blog like this one so much of what I’ve learned has been through trial and error. So I thought I’d put down some of my lessons learned, and hopefully a few folks will find them helpful.

  1. Do Your Homework on Pricing. When I say this, I absolutely DO NOT mean just find out what items like yours are listed for. You need to find items that are a) identical to yours (or as close to it as possible),  b) compare what condition they are in, c) check the box on the left side of the page that says SOLD and d) be aware if the seller offered free shipping or not. Why are all of these important? Well, first you need to compare like to like, and find out if the site is oversaturated with items like yours. If so, you might have a tougher time selling. And it really doesn’t matter if someone is asking $49.95 for something just like yours, when all the others are selling for $15.00, and they’re in better condition than the item you have, or if everyone else offered free shipping. These are things you’ll need to factor into setting your price point.
  2. Be Honest With Yourself (And Your Buyers) About the Condition of the Item. If everyone else is selling something that is in an original box, and yours isn’t, you won’t get the same price. The same goes for scratches, tears, chips, etc.
  3. Take Excellent Photographs. For the love of God, I can’t stress this enough. I’ve seen people put items up for sale with out of focus photos. Screen Shot 2018-12-21 at 8.20.21 AMYou can see an example of one on the right that I copied from eBay (with all apologies to the photo owner). What’s that supposed to show me? The background competes with the item, so that’s the first problem, and the camera focused on the background so the watch is blurred. If I’m going to ask a complete and total stranger to put their faith in me, and buy something they can only see in photos, the least I can do is take decent ones for them to see what they are getting. What works best for me, is that I set up a small area in my house when I’m getting things ready for sale, and depending on what they are, or how much detail is needed, I might even set up some studio type lighting or put a macro lens and ring flash on my camera so that I can take really good close ups. Screen Shot 2018-12-21 at 8.26.26 AM                             Here is one of mine:  Notice how you can see all the detail on the back of the watch, including that there are minimal scractches?  I realize not everyone has the capabilities for the same set up I do, but everyone should be able to find a way to take a photo that is sharp and clear. Also, remember to take pictures from different perspectives: front and back, sides, underside, etc. Show brand names, model numbers, anything that shows specifics about your item.
  4. Give Details in the Description. Tell folks what you’re selling – provide sizes, measurements, colors, even year it was made. I bought an inexpensive digital calipers from Harbor Freight, and have used that to measure things like case depth and lug width on watches.  Think about what makes your item different or stand out, and include that in the listing.
  5. Consider Shipping Options. Are you offering free shipping? If so, that means you’re paying the postage for the item, which means depending on which option you select for shipping for them could be costly. I knew I wasn’t going to do this full time, and was only going to sell a little bit, so free shipping wasn’t a good option for me. I elected to have my buyers pay, but I offer them 2 options. The first is USPS Parcel Select, which is the cheapest, and the second is UPS Ground. In order to do this, however, you need to have your item pre-packaged and weighed BEFORE you list it for sale. I’m lucky in that my husband has access to boxes in a wide variety of sizes that would be otherwise tossed out, so we recycle them for shipping. He also has access to bubble wrap that would be recycled as well. Both of those have allowed us to not have to purchase shipping containers. If you do, you either need to know that cuts into what you make on your sales, or you’ll have to estimate those costs and add to the sale of your item as a fee. NOTE: When I weigh my items, I just use a kitchen/food scale. I enter the weight into the eBay listing tool as a range, so if something weighs 2 lb 4 oz, I enter it as 2-3 lb. You also need to know the dimensions of your box as you’ll have to put that in as well. If you don’t, the system puts in a default and if your item is larger, then you’ll eat the cost when you get to the post office.
  6. Auction vs Buy It Now. It depends. I go back and forth, and it just depends on what other items like mine have been when they sold. If most were Buy It Now, then I list mine like that. If you decide to do Auction, you have several options for the length of time to leave your auction open. If you set up items as Buy It Now, and you notice they aren’t selling, you can always drop the price.
  7. Offering Returns. I generally don’t for a couple of reasons. First, I want the darn thing out of my house and don’t want it back. Second, I know that what I’ve sold will work as I have stated it will, and I know that I pack things to not break during shipping. That being said, there have been a few times I have offered it, and when I do I add a disclaimer that says “If you wish to return an item, please reach out to me directly first and let me know the reason for the return. All items must be returned in the same condition in which they were shipped out in order to receive a refund. Return shipping to be paid by buyer.” 
  8. Don’t Wait to Ship. I try to ship orders out within 24 hours of purchase, and have a 100% satisfaction rating from my buyers. They trusted me enough to buy from me and send me money, the least I can do is to ship out their purchase timely.
  9. Watch Your Messages. If you’re selling lots of things you’ll find that the 30 free listings that eBay allows you each month can go quickly, however they will periodically send out a time limited offer with additional free listings. If you don’t respond to the email fast enough to claim the offer, it’s gone. So far I haven’t figured out how to auto forward messages from my eBay inbox to my regular email provider, so I need to just log into eBay and look there.
  10. eBay vs Goodwill. Einstein’s definition of insanity was doing the same thing over and over again and expecting different results. The challenge with eBay is figuring out when to stop relisting items that didn’t sell, and just give it to Goodwill (or some other appropriate charitable organization.) Just because it didn’t sell the first time, doesn’t mean it won’t. I just sold something after about the 4th or 5th relist…yes, I had to drop the price a few times on it, but it did finally sell. On the other hand, I have stoneware dishes that aren’t selling after 5 relists. It’s probably time to quit relisting those, take them to Goodwill and get the tax deduction instead.
  11. Documentation. I didn’t make a spreadsheet initially, and discovered that once the listing is done after a short period of time you can’t go back and find it if you wanted to copy the info you had in it, like a really clever description. So now I have everything on a spreadsheet including descriptions, and what the size and weight of the boxes are as I keep my items stored in a crawl space until they sell. It’s a lot easier to reference the spreadsheet to relist items than it is to crawl around in the crawl space. I also have a regular document that includes statements like the return items disclaimer that I can copy and paste into listings, such as a statement to link listings with similar items.

A couple of final thoughts…most of us aren’t going to get rich selling things on eBay. If you go into this thinking you will, you’ll get frustrated very quickly. What you will get is a little pocket change, and a cleaner house as you get rid of that stuff that’s been hanging around forever, for God knows what reason. Have fun with it, but stay realistic.

Things Mom Never Told You, Vol VI.

Reusing Razor Blades…

Have you ever used a single edged razor blade around the house for projects? I do all the time, from scraping my glass top stove to scraping paint off woodwork, and in the past I’ve used a razor until it seems dull, then tucked it into the plastic container it came in, on the “dispose” side until it was full and then tossed it. But I got to thinking, “isn’t that a waste? Can’t I sharpen them?” Guess what, it turns out you can! IMG_2542Get a blade sharpening kit, or if you already have a whetstone then get honing oil. You can see in the photo to the left, my whetstone with oil on it after I had sharpened a few blades along with my razor blade collection. (I managed to pull them back out of the plastic container with a tweezers. Carefully.)

After putting some oil on the stone I took the blade, and swirled it on the stone in the oil a bit, then held the blade at about a 20-30 degree angle, and pulled it backwards against the stone.IMG_2543 In the photo to the right, that would be pulling the blade from right to left. I did that on each side about 6-8 times, then wiped off the oil and  tested it by pulling it against the edge of a piece of paper. After all were sharpened, I put them back in the storage container, and labeled it so I knew they were sharpened but not new.  Now I’m all set with 14 freshly sharpened blades, and all it took was a kit we already had, and maybe 30 minutes to do all of them. And if you’re really in a rush, you can just pull them against some sandpaper. I used some 100 grit, that worked pretty well too.

Sparkling Porcelain…

Ever wondered how to get stains out of the toilet bowl, especially those under the rim? Pumice stones are apparently an insider trick of the housecleaning trade, according to the folks at Real Simple Magazine, who compiled a great list of 12 Things Only Professional Cleaners Know.  I’ve been using these for a while now, and they really do get the nasty stains out of the bowl, making it sparkling white again. Just make sure you get the stone wet first, or you can scratch the bowl. The article has some other really helpful tricks, well worth a read.

Winter Over Plants…

If you’re like me, you have plants that move from outside to inside over the winter, and of course that means a big adjustment for those poor plants in terms of available sunlight. Even if you have plants that stay inside year round, as we move through the months into winter, there is less available sunlight, and plants can get starved for sun (and really, who can’t, for the love of Pete, which is a different issue that can be solved with a plane ticket to Key West, but I digress). After a few weeks, plants can start to look pretty pathetic. An easy solution is to get grow lights for them, and the ones that are out now are so much better than the old ones that we used to use. Back in the day we used to get cool and warm fluorescent lights, which would cover the spectrum of light wavelengths needed to best simulate sunlight. Then they came up with a bulb that was in the shape of a floodlamp that was specifically for plants and had the right spectrum in one bulb. You can still get the floodlamp bulb in an LED style, which is really great and saves money, but even better you can now get one in a regular light bulb shape, which, if you’re geeky like me is known as an E26. There are a number of different brands, Feit is the one I have, which is what I’ve shown here with the green base.

fullsizeoutput_9bfd

You can see it looks like a regular light bulb, which is nice if you have some sort of directional light like one that clamps on, that you can put it into and aim it at the plant.


fullsizeoutput_9bfe


I took a picture of the bulb from the top (not quite centered, hence it looks slightly skewed) so you can see how they get the spectrum of both cool and warm light covered. It’s amazing what a difference it makes on my plants, and I can even keep my hibiscus blooming most of the winter with this. Add in a timer, and you’re good to go!


My promise: I will never share something with you that I haven’t personally tried. I won’t tell you it works if I can’t prove it. Where possible I will share photos or a video. If something is an epic fail, well I’ll tell you that too as I think that is just as valuable, even if I end up looking ridiculous doing it.

Who Really Uses Customer Wisdom?

After I woke up one recent morning, I looked out on the foggy backyard just waiting for enough warmth of sun to make it all go away. I had my first cup of coffee, and got out a new box of cereal, then opened the bag and r-r-rip! Right down the side about halfway. Grrr. Has anyone else ever done that? So that got me to thinking…with all of the changes that I see in packaging these days, and the addition of “zip closures” to so many things – chips, rice, frozen foods, pita bread, shredded cheese, the list can go on and on – why haven’t major cereal manufacturers figured this one out yet? I mean seriously? Oh some have, the generic, bagged cereals, but not the boxed ones. Not everyone is a family of 5 and going through a box of cereal a day, and even if they were a family of 5, they probably would have a variety of cereals anyhow! I’m guessing that people probably do what we do, which is to add a bag clip to the package, unless you have a day like today and then you have to empty the contents into a zip lock bag, or, they just transfer everything into a plastic container with a pour top and dispense from that. When my family had a cabin we had to do that, otherwise dry cereal became stale very quickly from the humidity.  So Quaker Oats, General Mills, Kellogg and others, I’m talking to you! Start putting cereal in resealable bags in your boxed cereals. Think of the great marketing you can do with that!! Not everyone is a big family, but I think everyone wants value for their dollar and HATES to waste food. On the other hand, when we have to throw out stale cereal it means we have to buy more than we planned for, so profits go up. Hmmm, no wonder why they don’t use the resealable bags…

Here’s another rant for you. I love coffee, and buy beans to grind for brewing. We usually buy the large bag of Dunkin’ Donuts because it tastes good and is a good price and I don’t mind the free plug I’m giving them. (“Hey Dunkin’, yoo-hoo!”) BUT…they do have one thing I have a problem with, and I actually sent them an email about it maybe a year ago. They sent me a generic “thank you for your concern” and some coupons in response, but to date I’ve never seen a fix. Here’s the deal. Take a look at the pictures below:

IMG_2311IMG_2314


Note that the bag comes with a nice twist tie attached for you to use to reseal the bag after you open it. Handy, right? Except…they attach the twist tie just below the spot on the bag where it’s sealed shut, and it’s not like you can open the seal by separating it with your hands. Nope, you need to cut the bag open with a scissors, so you have to cut off the top part of the bag, below the seal, and you end up cutting off the twist tie. You then have to go back, pull the tie OFF the part you just cut off to be able to use it. My suggestion to them was to glue it lower on the bag so you could cut between the twist tie and the seal, and then the tie would stay attached to the bag, letting you just roll down the top (like a competitor does) and you can’t loose it. Simple! The current way is a pain, especially at 5:30 in the morning, trying to open a new bag while I’m still half asleep.

Quite a few years ago, when we had a home on a wooded lot, we treated ourselves to a birdfeeder called a “Yankee Flipper”. It’s a squirrel-proof feeder, and if you’ve never heard of it, go to YouTube and look it up, there are some hilarious videos out there. When we moved to our new house we didn’t use it for a while, because we didn’t have squirrels. Now we do so I dug it out but the battery no longer holds a charge. It’s a nickel cadmium battery, and as you probably know over time if you don’t use them, they won’t charge. I contacted the company, and yes, you can buy a new “power stick”, which is the battery and motor unit…for $90! (A new feeder is $165 now).  But…and here is the big problem I have. When I asked them if the batteries are nickel cadmium, or if they have upgraded to nickel metal hydride or lithium, they told me they are still NiCad. WHAT? You want me to pay $90 for something that I know will go bad again, so I can pay that much for it one more time? Um, how about no? So my husband and I did what the little power stick said not to. “Do Not Open This…Your Warranty Will Be Void If You Do”. Well it was out of warranty years ago. So we opened it, figured out what kind of NiCad batteries they were, did some internet sleuthing, and ordered them along with some wire glue so they could be connected the same way the originals were. Total costs with shipping? $22.67.

Kudos to a company too, since I can’t complain ALL the time. I absolutely LOVE the new top on the Advil for Arthritis bottles. It’s a bit larger and has a scalloped edge, making it easier to grasp if you have arthritis, which I’m starting to feel in my hands. I keep one in each level of my house and just refill from a larger bottle.

So apparently one company did listen to their customers, but will others? Is sure seems that if it helps customers but hurts their bottom line, we’ll never see that change, so we can probably kiss the sealable cereal bag goodbye. I still have hope for Dunkin’ Donuts though.  Any of you have suggestions for manufacturers, changes you’d like to see?

Things Mom Never Told You, Vol V

How to Keep Patio/Deck Plants Looking Fantastic All Summer…

Are you like me in that you absolutely LOVE having plants outside on your deck or patio in the summer time, but hate the chore of having to water them every day? My patio is my oasis from life, I have Adirondak chairs and side tables that are painted cheerful colors, and everything is done to give me a tropical, “down island” feel for those few months out of the year we have summer. Having lush, well-watered plants for me is a must, and in the beginning of the summer it’s fun, but honestly by August, it’s a chore. IMG_3638 (1).jpg

The solution was to install a drip irrigation system, which sounds difficult, but really isn’t at all. I purchased my initial setup from Proven Winners, although there are others out there including the DIG system I found at Home Depot, which is what I’ve supplemented with. Here is a link to a video about the Proven Winners system, and you can purchase directly from them as well.  The customer service staff at Proven Winners are incredibly helpful and have a really fast response time. I’ve had emails answered within a day and sometimes the same day. The DIG website has a wealth of information as well, take a look at it too.

The way the system works, is that you have a coupler consisting of a backflow valve and adapter, that reduces the water pressure from your system down, and then the drip tubing connects to that. You then run the drip tubing around to where you want for your plants. You cut the tubing and insert a coupler to branch off tubing to extend it. They have “T” shaped couplers if you want to just have a single extension off, and “X” shaped if you want to have 2 extensions plus continuing your run. There are also different drip heads as well, depending on your needs. You can bury the tubing in dirt or under rock to hide it, run it behind objects, etc.

For the past several years I’ve put a brass “Y” splitter on our outdoor spigot, which allows us to have our hose still connected and then the drip irrigation on the other side of the “Y”. On that side I connect an automatic watering timer. For our patio I use a 2-zone timer, so I can run two separate sets of tubing. One set goes one direction, to the flowers, and the other set goes the other way, to the tomatoes and a few other flowers. That allows me to set two separate sets of times and frequencies. This year I also ran tubing through PVC pipe that I buried in the grass between the landscaped area off the patio, and out to a landscaped area further into the yard where I have a few potted plants. Then I know they get watered on the days our sprinkler doesn’t run. Depending on how many plants my patio ends up having, I may end up getting a 4 zone timer, as I’m not sure how many times I can branch off the tubing before I lose water pressure.

Pros and Cons of The Two I’ve Used

Pros: What I like about Proven Winners’ system is that the tubing is softer and more flexible than the DIG tubing I found at Home Depot. That allows me to disconnect it from the connectors and watering ends each year so I can change up the configuration every year. Another thing that I really like about PW, and I mentioned this above, is their customer service. I had a small problem this year with a part, and emailed them one evening about it, telling them what the issue was, and how I had tried to troubleshoot it, asking what else I could try. A few hours later (at 11 pm!) I had a response, which was basically “sounds like you have a broken part, I checked your order history and will send you a new one tomorrow at no cost.” Am I going to keep going back to them? You bet I am!

A couple of nice things about DIG is that it’s readily available from Home Depot, and they do have a bigger variety of drip heads available. So if I’m in the middle of set up and run out, or if I find that some of mine are no longer working I can just run up there and get new ones. I don’t have to order them online and wait, and is a bit more cost effective.

Cons: The tubing from Proven Winners so far only comes in white and tan, while the tubing from DIG comes in brown and black. IMG_1341
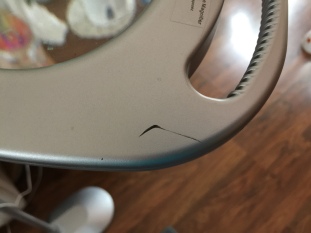
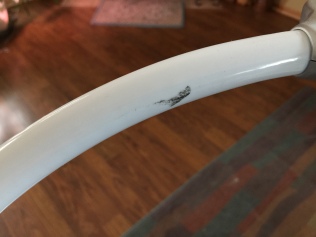
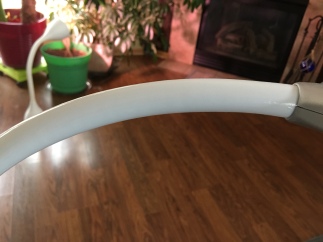
Our patio is stained a terra cotta color, so both white and tan tubing show up VERY well, as you can see. I did talk to the nice folks at Proven Winners and even sent them this picture of our patio with white tubing showing, letting them know that not everyone has white concrete patios and could they perhaps get brown tubing? They said they would mention it to their vendor, but so far their website still has only the white and tan.

Another con, and this is a biggie for me, is that the tubing from DIG is very rigid and inflexible, and much more difficult to remove it from the connectors. So if I want to change configuration I have to boil water, and put the connection in the water for several seconds to make the tubing very pliable and I can then pull it off. If it starts to cool down, it won’t come off.  At that point I have to go back in the house and reheat the water, or cut the tubing off the connector and then take a utility knife and cut away the small amount of tubing that is still on the connector to start over. I’m either wasting additional time or money. I sometimes have to use warm water to soften the connections from Proven Winners to get the tubing off, but the water can cool down a lot more before I have to reheat it, so I have a lot more working time with it first, and I find I don’t always have to do that. Sometimes I can just pull connections apart. However, do that too often and the Proven Winners tubing will stretch out at the connection, leaving you with a leak.

Overall, it’s a toss up. I like Proven Winners tubing better, but DIG has more watering end options and I really like that, plus their brochure is really informative. I do wish I had known about a drip irrigation system years ago, and if you’ve never tried one before, give it a shot. They really are easy to set up, and you’ll wonder how the heck you lived without one this long. Let me know if you have questions about setting one up, or your success using one.

My promise: I will never share something with you that I haven’t personally tried. I won’t tell you it works if I can’t prove it. Where possible I will share photos or a video. If something is an epic fail, well I’ll tell you that too as I think that is just as valuable, even if I end up looking ridiculous doing it.

Things Mom Never Told You, Vol IV

…How to Cheaply Make Homemade Magic Erasers!

It seemed like every time I turned around, I was seeing another use for Mr. Clean’s Magic Eraser sponge. “Get marks off your walls!” “mystery marks on cabinets? No problem!” and best of all, “scuff marks on patent leather go away so easily with the Magic Eraser” (it’s true, they do. When I was traveling for business I kept a small one in my wheeled computer bag for my work shoes.) But if you use these, you also know they can get expensive, as they also magically disintegrate and disappear with use.  At Target, Walmart, and Amazon, a 4 pack of the “original but 2x stronger” (if it’s 2x stronger, then how is that the original, but i digress) costs .87¢ a sponge. That adds up fast! So when I stumbled on an article about making your own for a whole lot cheaper, I thought I’d give it a try. I ordered melamine sponges from Amazon, and then made up a solution of warm water, Borax and baking soda. (1/2 cup warm water, 1 tsp Borax and 1 Tbsp baking soda.) After those were mostly dissolved in the water I dunked the sponge in the water, let it absorb the liquid then squeezed most of it out and tested it on some marks I found on a lamp. This is a free standing gooseneck floorlamp that I use for crafting, and my husband looked at it yesterday and wanted to know how I’d scratched it so badly.

fullsizeoutput_98c6

IMG_2229


After using my homemade magic eraser:

IMG_2231

IMG_2230


Estimated cost for my eraser? .59¢ for the sponge, 1.2¢ for the baking soda and <1¢ (.006 actually!) for the Borax for a total of under 61¢. Now I can guess what you’re thinking…20¢ isn’t a huge amount to save, and you could be right, especially if you’re a fanatic about coupons. But here’s the thing about that. I only bought a small bag of them because I didn’t want to be stuck with a huge container if this was a fail. I’ll keep working with them a bit but so far I’m happy with it. Assuming it does work well, you can get a bag of 100 for 7.59, which comes out to 7.5¢ per sponge, bringing your total cost per sponge, soda and Borax to less than 9¢. (And you can get more than one sponge saturated with the amount of liquid, so it’s really even cheaper than that!) As my husband and I like to joke around with each other, “How do ya like me now?”

…How to Clean Grippy Rubber

 Note: Includes an update on the homemade magic eraser. Have you ever had something with black rubber grippy stuff on it that has gotten really nasty? We had a remote control that was just plain gunky, covered with dust, cat hair and lord knows what else. After a fair amound of research, it seemed the best thing to use to clean it was WD40. So I tried putting that on my finger, then rubbing it on the rubber. I tried first wiping it off with a soft cloth, that didn’t work. I reapplied it and let it sit for a while, then wiping it off, that didn’t work either, still gunky. Third time I reapplied and let it sit, then came back and cleaned it off with my magic eraser. It completely removed the gunk. Disclaimer, it also did remove the grippiness of the rubber, which is probably from the abrasive action of the sponge. But you have to ask yourself if the trade-off was worth it, and for me the answer is “yes”. The alternative was not touching the remote, as the “eww” factor was getting up there.  (I also have tried cleaning grippy black rubber on something else with a store bought magic eraser and no WD40, didn’t work well at all.)

Extra notes of caution: Anytime you’re cleaning electronics, whether it’s a floor lamp, a remote control unit or anything else, just remember a couple of things. 1. Never spray anything directly onto your item. For the WD40, I applied it to my finger first, then used my finger to put it on the remote. Even though WD40 displaces water, and some people use it in electronics, my feeling is that it’s better to be safe. 2. Water is also not a friend of electronics. Squeeze out that sponge as if your life depends on it, and have paper towels close by to wipe off drips quickly. You really don’t want water getting inside the cases of things you’re working on. 

…How to Clean White Crusty Water Stains Off Things

You know the white crust that you get on things, like around your sink, or maybe on the drip tray for your ice maker, or even the floor mats of your car? I’m a great believer in less manual effort and more “find an easier way” if I can, and for that stuff I have. I soak it in some white vinegar. Usually about a 10% solution will do, but if it’s particularly stubborn I’ve gone stronger, even up to full strength. Yesterday I took the winter floor mats out of my car and poured some into them and let them soak for about an hour to get the salt residue loosened up. Worked like a charm! After I rinsed that off, I gave em a quick soap scrub and then they were done.  For sinks, I take an old rag and soak it, wrap it around the base of the faucet and let it soak for thirty minutes or so, then check and see if the crust has softened enough to either wipe off or scrape (gently and carefully) with a razor blade. We have a recirculating water fountain for our cats water dish, made of stainless steel that I’ll take apart and soak in vinegar as well. Again, why spend time scrubbing when I can soak that crap off? Put some in a spray bottle and spray down your shower, especially if you have glass doors. Let it sit for a bit then wipe off and it will help to get the built up soap scum off. If it’s really bad you might have to do it a few times.

My promise: I will never share something with you that I haven’t personally tried. I won’t tell you it works if I can’t prove it. Where possible I will share photos or a video. If something is an epic fail, well I’ll tell you that too as I think that is just as valuable, even if I end up looking ridiculous doing it.

Things Mom Never Told You, Vol. II

From time to time I find these little helps referred to as “lifehacks” by many, a term my husband detests. I’ve put a couple of them together to share with you, and over time as I come across more I will keep doing so. I want to make you all a promise right out of the gate – I will never share something with you that I haven’t personally tried. I won’t tell you it works if I can’t prove it. Where possible I will share photos or a video. If something is an epic fail, well I’ll tell you that too as I think that is just as valuable. So with that, I bring you the next edition of “Things Mom Never Told You”.

Have you ever wondered how to….

…Really get the top of your travel coffee mug clean?

Me neither, until my husband took a good look at mine one day and said “um, honey, this is pretty nasty. You might want to give it a scrub.” Now, I rinsed out the top of my travel mug faithfully EVERY time I used it, with HOT running water. I have a spillproof Contigo, so I even held the button open so water ran through it. You’d think it would be clean. Nope. I tried soaking it a few hours in denture cleanser tablets…followed by a vinegar bath….followed by a mild bleach bath. Nothing worked. I even took old flannel sheets and ripped off little strips and poked ’em into the corners. Got lots of crap out, but I could see it still was gunky. After a bunch of searching on the internet (because we all know if you find it on the internet it’s true!),  I found the magic solution.

Mix a solution of about 1/3 vinegar and 2/3 water, enough volume to cover the top of your mug. Put it in a container large enough that it is a couple of inches higher than the mug top, and set it in the sink. (Do not omit this critical step! You’ll thank me later.) Add a generous tablespoon of baking soda, and watch it foam like CRAZY! When it’s done, you can put a lid on it and agitate, although you’ll need to take the lid off every few seconds to let the air out. You’ll be grossed out at the gunk that comes out of your lid. I’ve done it now 6 times, and still getting gunk out of mine, as you can see in the video that I posted online. In that I don’t put a cover on it, but just stirred it around a bit and let it sit and soak.

You can continue to add baking soda, until you don’t get any more foaming up. At that point the vinegar is neutralized and you’ll need to have fresh water/vinegar for cleaning. This also works to de-gunk the lid of your coffee carafe if you have a thermal type pot, and I even did the drip basket on our coffee maker and got some results. I expect it will work with anything with nooks and crannies you can’t get into. I keep hearing how good vinegar and baking soda are as cleaners, as both are cheap, so don’t be afraid to use them. A 1 lb box of off brand baking soda at my grocery store is $0.69, and a gallon of white vinegar is $2.99.

Another good use for vinegar is to soak an old rag or paper towel with it and wrap it around the base of your sink tap and handles, where they get calcium built up. snug it up and let it sit there for a half hour or so, nice and wet. (If you use a paper towel you may need to rewet it periodically with more vinegar as it will dry out.) When you remove the rag, much of the build up can be wiped away, and most of the rest will scrape away pretty easily with a razor blade.

…Get the most out of your tubes and bottles of lotion and makeup?

Got this one from my awesome manicurist Brenda, to whom I shall be forever grateful. I think this is one of those salon insider secrets no one wants you to ever know, but I’ll share anyhow. So…when you think that tube of moisturizer, conditioner, hand lotion…whatever it is…when you think you’ve shaken it a dozen times and tapped it on the counter ten more and just can’t get another drop out of it, here is what to do. Go and get a popsicle stick, a small zip top bag, and a scissors. Cut the tube apart near the opening, maybe 2 inches (less if it’s a small tube) and use the popsicle stick to scoop out what is left in the tube. You might even find some residual you can scrape out of the other end too, so don’t forget to check that side as well. I put the stick and the parts of the tube in the bag and close it up in between uses, so that whatever I’m scooping out doesn’t dry up over the course of the next few days, since the tube is now open to air. If you won’t be using up the product in the next few days, transfer it to another container that seals up well but is smaller. For one rather expensive  hair product I got 4 additional applications out of the tube!

To get additional liquid out of small glass bottles, try reforming a paper clip. Straighten it out first, then put a small loop on the end and bend the loop 90 degrees to the rest of the clip. You’ll probably need a needle nose pliers for this, and may even need to use the pliers to get the paper clip far enough into the jar, so keep it handy. You’ll also need a small container to put the residual liquid in. Tiny travel containers or containers with screw on lids from camping stores like REI or Gander Mountain work really well for this. Check out the  video below. In fairness, I’ll offer the following disclaimers: I could have spent a little more time scraping out the bottle to get more out of it or perhaps made my scraper a better design, but I wanted to demonstrate what could be done for the video. You nay come up with a better way to do it, so feel free to let me know in the comments if you do.

As an addendum, I ended up getting about 5 additional applications out of that bottle.


Have fun!