When my husband told me he was going to go on a camping trip with a couple of guys again this year, I decided I was NOT going to be left out. No siree, I was going to have a little fun of my own, and got ahold of my cousin who is also one of my dearest friends and asked if she would like to go on a vacation with me. Her response was an instant “of course!” and after a lot of back and forth as to where we’d go, we settled on a road trip down the Great River Road, driving down along the Mississippi River for 5 days. One of our aunts asked if we were going to be like Thelma and Louise, and if we were smart, we’d have gotten t-shirts about the movie (or at least a couple of them with Brad Pitt’s face on ’em, goodness!) But it certainly was an adventure, and I thought I’d share a bit of it with you.
Day 1
Got only a little lost, twice, because really it wouldn’t be a road trip without getting lost, right? To our credit we were following the map we got from the Great River Road website, but it was a really crappy map. But that’s ok because getting lost was part of the adventure, and who cares, it’s vacation. We spent the first night in a lovely hotel in Muscatine, Iowa, called The Merrill, right on the river. If you’re ever in Muscatine, I highly recommend staying there. It’s a new hotel, the staff couldn’t have been nicer or more welcoming and helpful, the rooms were comfortable and clean, with nice amenities and the price was good. Breakfast the next morning was excellent (steel cut oats with dried fruit compote and creme brulee-like crust of brown sugar on top. It was absolutely heaven, and then once again we were on our way.
Day 2
As we continued down the road, we stumbled on Fulton, where we noticed a huge windmill in the center of town. Being we are both of Dutch descent we had to check that out, so we drove to it and found out it was one of two working windmills in the US.  Fulton was settled by the Dutch, and as they say “if you’re not Dutch, you’re not much” so I guess it’s a swell little town. We took selfies by the windmill (it’s REALLY hard to take a selfie while facing the sun and trying to make sure you get the windmill included in the background, just sayin’), then texted our moms and told them we lied about the road trip and flew to Holland instead. I’m pretty sure neither of them bought it, but it was still fun anyhow, and just the kind of mischief our grandpa Cornie would have loved.
Continuing the drive south from there, we wound alongside the river, through farmlands, and just enjoyed the scenery of the midwest. We had hoped to make it through St. Louis when there wasn’t rush hour, but I guess there is no such time. We also didn’t know that the route we planned to take had an unexpected closure due to a chemical spill, so that caused us to get slightly lost the second time as we couldn’t take the exit we planned to, shot farther south than expected, went off the freeway and turned back north, got on the freeway, then went past where we wanted to be, had to exit the freeway again and ended up in a residential area that quite frankly had seen slightly better days before we were able to find the reroute we needed.
We finally got to Hannibal, MO that second night, home of Mark Twain. We thought about touring his boyhood home but decided against it as we thought $12 seemed a bit much. I didn’t know his home was only a block from the Mississippi River, which helps to explain its influence on his life. Dinner was a riverboat cruise on the Mississippi, and I’m fairly certain that other than the crew we were the youngest ones there. We did meet a lovely couple in their 60’s who made it a goal to visit all 50 states, and this year they were on #’s 44-47. Next year they will finish the last 3. They fly from home and fly state to state, taking in something of each state over a period of a few days. When they finish next year they’ll wrap up their trip in Fargo, ND, because apparently at the visitors board in Fargo you can have your photo taken next to a statue of the woodchipper from the movie “Fargo”, complete with a fake leg coming out of it, if you’ve visited all 50 states, and you get a certificate indicating you’ve completed all 50. Since their last name is Fargo, she said it just seemed apropos.
The dinner on the boat was nice, the ride on the river was fun, but the downside was returning to the dock. The gnats/bugs were swarming the dock lights, which were right outside the exit door. And when I say swarming, I mean when I first saw them, they were so thick I thought it was fog! Leaving the gift shop, you literally had to hold your breath, duck your head and run. My cousin and I could do it, but the older folks on board had a hard time of it, and even running we still had to swipe bugs off our clothes when we got to the car. A nice heavy-duty fan to blow them away wouldn’t have gone amiss there!
That night we stayed at the Comfort Inn and Suites in Hannibal and I’ve never had a bad night at one, until that night. We were awakened sometime after midnight to the sound of what seemed like bowling balls being dropped on the floor. Repeatedly. After several minutes of heavy footfalls, repeated thumps and no speaking, we called management who said they would take care of it. The noises stopped; we went back to sleep only to be reawakened a short time later by the same noises. Another phone call to the management, another request to have it handled. Then at 5, my cousin woke me saying “do you hear that?” it was water (or some clear liquid) dripping onto her bed from the ceiling. It was in a straight line, about 18″ long, steadily dripping. Another call to management, but this time we asked him to come to the room. He did, where the poor 30-year old manager was confronted by 2 tired and crabby middle-aged women. We showed him the issue and handed him the bill that had been slipped under the door and my cousin just said “take care of this. We’ve had a horrible night between the guys above us and now this, and we aren’t paying for this room.” Fortunately, we’d gotten a room with 2 beds, so rather than move to another room we shared my bed for a couple more hours of sleep before getting up and heading on our way. But I swear I couldn’t help but wonder what the heck those guys were doing up there? Meth lab? Dismembering bodies? Good lord I know I have a vivid imagination, but who makes that much noise in the middle of the night without talking? Seriously!
Day 3
Before leaving Hannibal, we thought about touring the Mark Twain caves, but decided not to pay the $20 admission fee and instead drove up a lovely overlook called “Lovers Leap”.

There’s a legend about an Indian Princess and her lover, who leapt to their deaths rather than be separated. Here are photos of the monument to them along with one with the story.  There was also a monument there to 3 boys who disappeared from near there after going exploring one day, back in the late 1960’s. To this day they’ve never been found and it’s not known if they fell into some caves and couldn’t get out, were abducted or what happened.
  Look the story up, it’s spooky and very odd.
Still to come, Paducah, KY, the confederate flag, Jefferson City and donuts! Next up, “The Road Trip, Part 2” and the rest of our adventure.


 So I found it on Amazon, ordered it, prayed it would arrive when he was at work (it did), hid it in a closet and waited. Since he’ll be camping when his birthday is this year, I figured I’d give him the glasses this weekend. This morning, while I had a small break from working, he came into my office and said “oh by the way, just thought I’d let you know I just ordered another set of the tiki bar glasses as a backup set for ours.” I just sat there and finally said “you have got to be kidding me” then got up, went to the closet, pulled out the box, handed it to him and said, “well, hell, Happy Birthday honey!” He peeked in the box and just started to laugh.


 I also wonder if we suddenly have had a bumper crop of idiots that have moved here, or if I’m just becoming an old fuddy duddy, but it seems to me with each new storm, I see really stupid people out who have no business driving. With all due respect to Bill Engvall, I really want to say to them, “Here’s your sign”.
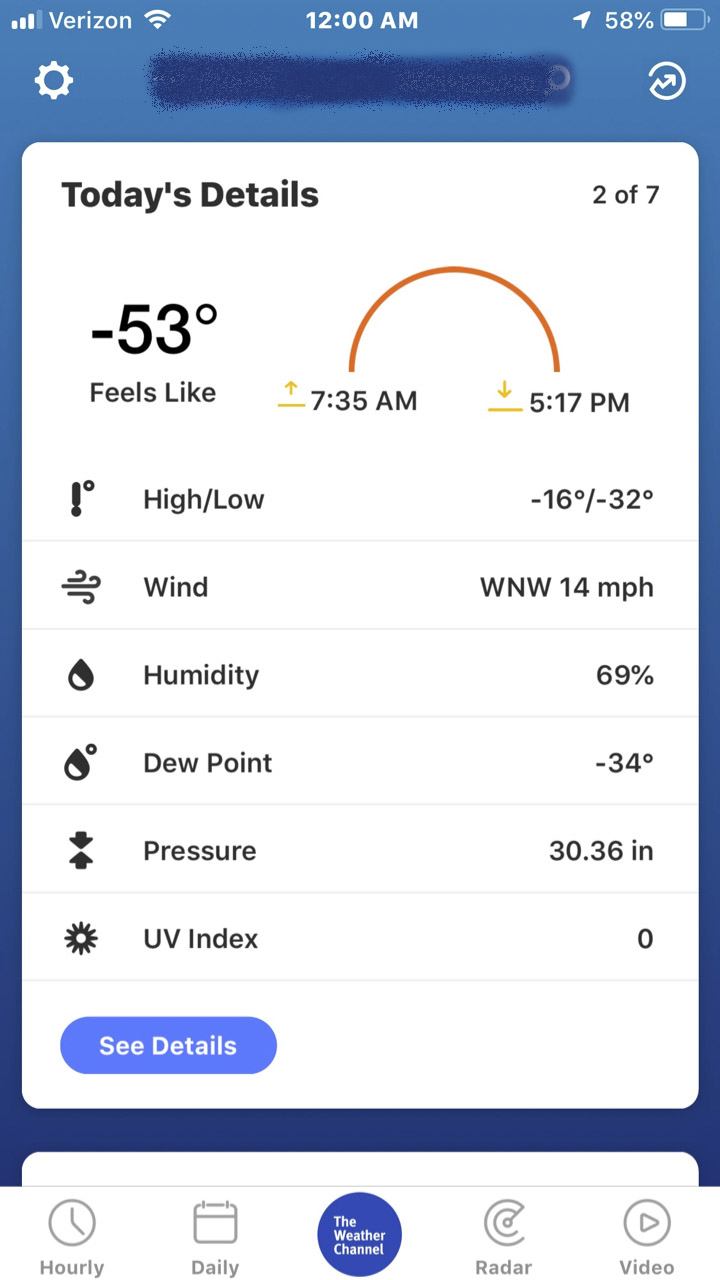 Note that the actual temperature was probably ONLY about -32 degrees. It just felt like -52 with the wind chills. Just. Brrrr. What’s really bizarre was that the next day was 24 degrees. Above zero. That’s a 50 degree swing in two days, and wow, it hit 36 on Sunday!
