Planning for Financial Emergencies

Periodically I see articles on various news sites that have headlines with themes about saving money, and more specifically what you need to do to be prepared for the unexpected, such as the loss of your job. Most say things along similar lines: Have at least 6 months worth of salary saved up to cover expenses, and make sure you estimate medical costs, unexpected car repairs, and other things of that nature. If  you use any sort of bill paying software, such as Quicken, a tool like that can really help to make it easy to run a report quickly and simplify some of the estimating.

I suspect a lot of people don’t even think about something that I think is critically important, and none of the articles that I’ve read have really addressed it either. How many of you know what your health insurance costs each month? I’m not talking about how much is taken out of your paycheck, I’m talking about adding that to what your employer subsidizes to get the TOTAL cost, or what you would pay if you had to get your insurance through COBRA. In case you’ve never heard that term before, COBRA stands for the Consolidated Omnibus Budget Reconciliation Act, which was passed into law in 1986. According to information on the US Department of Labor website it “contains provisions giving certain former employees, retirees, spouses former spouses, and dependent children the right to temporary continuation of health coverage at group rates”. So basically if you got health insurance through your employer and lose your job, under certain conditions you can continue to get that insurance at those group rates. However, and here’s the kicker – your former employer will no longer subsidize or pay a portion of that insurance for you. Screen Shot 2018-11-08 at 7.25.34 AMYou’ll need to pay all of it yourself, and if you thought you were lucky because your former employer didn’t charge you a lot for health insurance when you were working , well, you might want to be sitting down when you get that information, because that same non-subsidized health insurance is really expensive!

How expensive, you ask? At my former employer, coverage for my husband and I for health, supplemental life and dental went from $320/month to $1170/month. Think about  the implications of that for a moment…so now not only do you NOT have an income, but you get to shell out an extra $1000 or more a month for insurance. For that same high-deductible plan you had before. And if you were unlucky enough to get laid off at the end of the year, or don’t find a job right away and are still unemployed after the start of the next calendar year rolls around, your deductibles and out-of-pocket costs reset, which means that you get to start all over again meeting those too. So any money you had in that lovely HSA account can be used for the insurance or medical bills, but trust me, it will go very quickly.

If you’re confused on the difference between deductible and out-of-pocket, you’re not alone! I’ll try to explain it here, and add in a good website resource as well. Your deductible is the amount you first need to pay before your insurer will start to help you with what you owe toward bills. After that, the insurer will pay part, and you’ll pay part, until you hit your out-of-pocket maximum, at which point the insurer pays all of it. Where it can get confusing is adding in family members. If you have just two people insured, you can have one meet both the deductible and their out of pocket maximum, but the other person is still paying the full amount for everything because they haven’t yet met THEIR deductible.  If you have more than two people by adding in children, then those deductibles still need to be met but at least the out-of-pocket maximums are cumulative toward the family out-of-pocket maximum. Yikes! I know that our insurer has a really nice graphic on the website showing where we were at all times with meeting deductibles and out-of-pocket maximums, and I would expect most others do as well. MoneyUnder30 has a good page on their website that can help with understanding those and other health insurance terms.

So yes, think about your monthly expenses, but educate yourself too on what your insurance will cost you if you’re not working. It’s eye-opening, and probably far more expensive than you think. Even routine annual checkups can add up when you start adding in lab tests and x-rays, since most visits are “cafeteria” type, meaning each thing done gets a charge. For those with high deductible plans, here are some AVERAGE costs that will wipe out small to medium savings:

Office visits for physicals…$180-240

Adult office visit for illness…$130-180

Child office visit for illness $115-160

Adult ER visit (visit only, doesn’t include labs, x-rays, etc) $580-700

Child ER visit (visit only, doesn’t include labs, x-rays, etc)  $510-635

Colonoscopies…$900

Mammograms…$120

Shingles vaccinations…$250

Chest xray…$370

Blood count tests…$5-15

Flu shot…$40

As you can see, start adding in labs, x-rays, etc, and it doesn’t take much before things add up. Add in a couple of sick kids, or sports injuries and physical therapy and the money is gone.

Costs may vary by region of the country, insurer, and contracts negotiated, among other things.  The prices listed above came from a couple of sources, including Blue Cross Blue Shield of Massachusetts, and CostHelper.com. You can probably find cost estimators at your insurer as well.

So besides planning for the rent or mortgage, the car payment, gas, utilities, food, clothes, the pets, school events, and all that other stuff, don’t forget to educate yourself about the true costs of ALL of your healthcare costs.

For more information on COBRA, go to the Department of Labor website.

PS, preventing illness is still a great idea and saves money! It’s flu season, and flu shots are cheap and readily available. Some county health departments will do them for free, I’m seeing Costco/CVS offering for around $20, Walgreens and Target for $40. If  insurance covers medication, your flu shot might be covered too. Don’t forget to get yours!


Advertisement

Expectations vs. Reality

While my husband was on a camping trip this summer with some guys, I decided I would make good use of the time and paint another room in our house. We moved in here 6 years ago, and hadn’t finished repainting all the rooms yet, so it was (way) past time to tackle another room. This year I started in the master bedroom, which was painted in 2 shades of blue…medium dusty blue and dark dusty blue, 2 walls opposite each other were one color, and the other 2 walls the other color. Ugh.fullsizeoutput_9b7d

So I started my prep work, patching holes, and I felt like I went through about a half gallon of spackling compound covering up all the dings and dents from the prior owners, not to mention the screw pops in the sheet rock as well as a couple of bad spots left where we took a mounting bracket for a TV off the wall. The TV bracket had adhered to the paint which was really unexpected, given that the paint was long cured by the time we moved in and put up that bracket. So when we took it off it started giving us some trouble then suddenly came off with a big r-r-r-i-i-p-p and we just stood there with that look of “oh, crap” on our faces. I knew right then I was in for hours of patching and sanding, and I wasn’t disappointed. I can’t tell you how many times I redid that spot before I was satisfied.

Now unless you’re a professional painter, I’m going to say that you probably can’t do a good job of painting a room without one really essential thing: painter’s tape. Some folks know it as “blue painter’s tape” and others as “frog tape” but it all does the same thing: when applied correctly (or at all) it will keep the woodwork from getting paint on it. By now you can probably guess where I’m going, but honestly it was WAY worse than you can imagine. Because after the patching is done, normally you think “yea! It’s time to prep and tape the woodwork”, right? Nope, not in this house, or at least, not in the normal, traditional sense. You see, the prior owners didn’t believe in painter’s tape, or they just waved it over toward the wood and prayed it landed in the right spot. That room had been painted at least 3 times in 10 years and not once had they used painter’s tape. I know this because there were 3 different colors of paint layers on the edges of the windows, doorways and baseboards and in varying amounts. Sometimes just a tiny brush mark, but in one place two layers extended for a 2-foot run! And if that wasn’t bad enough, they roller painted over outlets and the cold air return as well – both the wall plate AND the actual outlet! I mean come on, how hard is it to remove a wall plate and slap tape on an outlet?

So there I knelt, squatted, stood and climbed up and down a ladder for 2 days, with a razor blade, scraping wood. I tried everything I could think of to help loosen the paint but in the end it just seemed simplest to do old-fashioned scraping and try not to ruin the woodwork. Finally, it was as good as I could get it, and then out came the Frog Tape. Everywhere, there was green tape. Take that, prior homeowner! About the only place I didn’t tape was along the ceiling edge but I’ve been taught how to cut in the paint along an edge, and was planning to repaint the ceiling when I was done with the walls anyway, for two reasons. One, it had never been done in the 17 years since the house was built and two, guess where else they got medium and dark blue paint? (But I DID tape off the walls when I did the ceiling. I’m good, but not perfect!)

Finally, it was time to paint, and the walls and ceiling look fantastic. You don’t realize how dingy your ceilings are until you paint them bright white. (Here’s a helpful tip: Glidden makes a wonderful ceiling paint that goes on pink, but dries white so that you can see where you’ve painted, as that can be difficult with white on white ceilings. I love that stuff!) I also love my 5 brand spankin’ new outlets, which at just over $2 each for the outlet and wall plate combined seemed money well spent so that I didn’t have to spend time scraping paint off the old ones, and my new cold air return. (Follow up note: I later found a multipack of outlets at our local big box retailer, 10 for under $4, plus 10 wall plates for under $2!)

IMG_2544
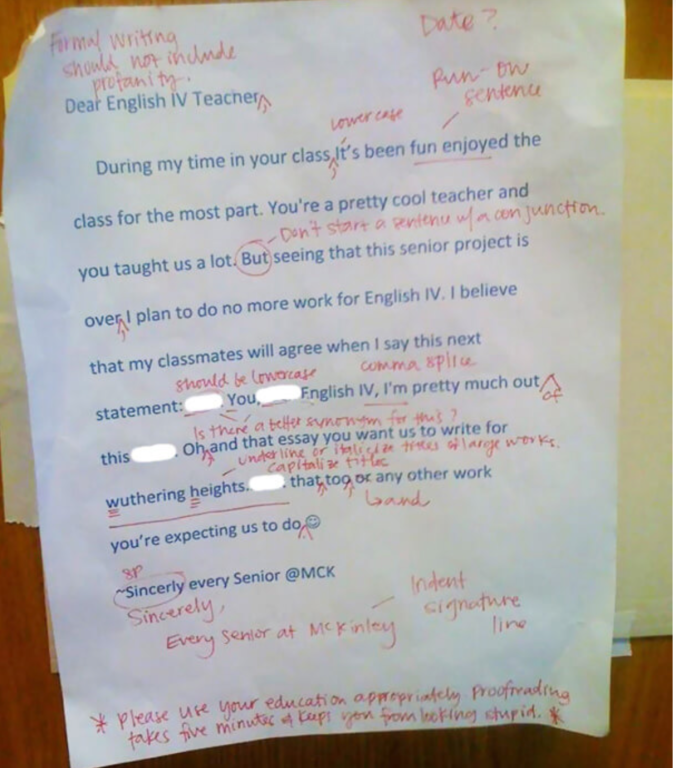
I don’t get it…what the heck is so hard about taking 20 minutes to put some painter’s tape around woodwork? Are you really that flippin’ lazy? I guess the answer is “yes” because our entire house is like that, the one exception being our upstairs hallway, and that’s only because it’s never been painted and is still only primed. (I’m actually kind of excited to paint that area next.) I used to think that people would take a bit more care of their homes. I mean good grief; you pay this much money for something, why wouldn’t you fix it up right? But the reality is that people don’t take care of things, don’t do even basic maintenance, like changing furnace filters, cleaning lint out of the dryer trap or stop their kids from writing on closet walls. I guess I need to lower my expectations, because clearly my reality doesn’t match theirs. But at least the room looks wonderful, and the ceilings have only white ceiling paint on them now. Now on to the hallway and then the living room/dining room/kitchen, which is really a great room. THAT’s going to be a project and then some!

The Child in Me

It’s summer in Minnesota, or as we like to call it, the season of construction, mosquitos and humidity. This year I’m adding “thunderstorms” to that list, as it seems we’ve had more than the usual number of them for some reason. A number of our rivers had flood warnings associated with them, and as I am typing this I looked at the radar, and storms are setting up already today and it’s only 7:00 in the morning. Of course all the rain has provided a rich source of breeding grounds for even more mosquitos. That in turn, means more visits from the DNR as they fly overhead with the helicopter loaded with mosquito bomb pellets. I swear when they come over the house and I feel the cavitation from the rotors, it’s all I can do not to yell, “hit the deck!” and fall to the floor.

I am fortunate enough to be able to be a surrogate mom for my next door neighbor’s dogs, at least for the time being, and let them out during the day, and the other day when I went over there, it was one of those lovely rainy days out. So I put on a rain jacket and headed out, and on my way back I thought, “I’m going to take a quick walk. What’s the worst thing that will happen?  I have on sandals that can get wet, so no problem there. My Capri jeans will get wet. So what? I won’t melt.” So off I went.

I’d forgotten how much fun it was to take a walk in a warm rain. I loved the sound of the raindrops on my hood, on the leaves on the trees. It was so unbelievably peaceful and calming. After I’d been walking a bit, I noticed that I’d started stepping less and shuffling my feet more (sorry Dad, I know you hated it when I did that and I can still hear you say “pick up your feet”!). It didn’t take long before I was kicking up small water puddles, and from there I worked my way up to bigger ones. It got more and more fun, and soon I was soaked above my knees.

When was the last time you went puddle stomping?  There is a reason toddlers and children do it, there really is something truly freeing about it.

IMG_1390

Many thanks to my great neighbor who allowed me to take this photo, and to her awesome daughter for playing along!

I almost put my hood down and tipped my head back letting the rain run on my face – cue the dramatic music here – as I stretched out my arms and twirled in a circle – but I figured if I did that, the next thing I’d see was the men in white coats with a straightjacket. As Robert Fulgham said in “Everything I Need to Know I Learned in Kindergarten”, you can’t explain everything you do to everybody, you know. So I did the big Hollywood movie twirl in my mind but continued the puddle stomping throughout my walk, until my rubber sandals were so wet they squeaked and I had wrinkly toes.

If you have the chance to go puddle stomping, unleash your inner child and go for it. It’s a lot of fun, and you’ll feel great afterwards. Your stress levels will drop and you’ll find your shoulders aren’t up by your earlobes anymore, and your mind will be clearer. That’s all good, no matter what age you are.

Who Really Uses Customer Wisdom?

After I woke up one recent morning, I looked out on the foggy backyard just waiting for enough warmth of sun to make it all go away. I had my first cup of coffee, and got out a new box of cereal, then opened the bag and r-r-rip! Right down the side about halfway. Grrr. Has anyone else ever done that? So that got me to thinking…with all of the changes that I see in packaging these days, and the addition of “zip closures” to so many things – chips, rice, frozen foods, pita bread, shredded cheese, the list can go on and on – why haven’t major cereal manufacturers figured this one out yet? I mean seriously? Oh some have, the generic, bagged cereals, but not the boxed ones. Not everyone is a family of 5 and going through a box of cereal a day, and even if they were a family of 5, they probably would have a variety of cereals anyhow! I’m guessing that people probably do what we do, which is to add a bag clip to the package, unless you have a day like today and then you have to empty the contents into a zip lock bag, or, they just transfer everything into a plastic container with a pour top and dispense from that. When my family had a cabin we had to do that, otherwise dry cereal became stale very quickly from the humidity.  So Quaker Oats, General Mills, Kellogg and others, I’m talking to you! Start putting cereal in resealable bags in your boxed cereals. Think of the great marketing you can do with that!! Not everyone is a big family, but I think everyone wants value for their dollar and HATES to waste food. On the other hand, when we have to throw out stale cereal it means we have to buy more than we planned for, so profits go up. Hmmm, no wonder why they don’t use the resealable bags…

Here’s another rant for you. I love coffee, and buy beans to grind for brewing. We usually buy the large bag of Dunkin’ Donuts because it tastes good and is a good price and I don’t mind the free plug I’m giving them. (“Hey Dunkin’, yoo-hoo!”) BUT…they do have one thing I have a problem with, and I actually sent them an email about it maybe a year ago. They sent me a generic “thank you for your concern” and some coupons in response, but to date I’ve never seen a fix. Here’s the deal. Take a look at the pictures below:

IMG_2311IMG_2314


Note that the bag comes with a nice twist tie attached for you to use to reseal the bag after you open it. Handy, right? Except…they attach the twist tie just below the spot on the bag where it’s sealed shut, and it’s not like you can open the seal by separating it with your hands. Nope, you need to cut the bag open with a scissors, so you have to cut off the top part of the bag, below the seal, and you end up cutting off the twist tie. You then have to go back, pull the tie OFF the part you just cut off to be able to use it. My suggestion to them was to glue it lower on the bag so you could cut between the twist tie and the seal, and then the tie would stay attached to the bag, letting you just roll down the top (like a competitor does) and you can’t loose it. Simple! The current way is a pain, especially at 5:30 in the morning, trying to open a new bag while I’m still half asleep.

Quite a few years ago, when we had a home on a wooded lot, we treated ourselves to a birdfeeder called a “Yankee Flipper”. It’s a squirrel-proof feeder, and if you’ve never heard of it, go to YouTube and look it up, there are some hilarious videos out there. When we moved to our new house we didn’t use it for a while, because we didn’t have squirrels. Now we do so I dug it out but the battery no longer holds a charge. It’s a nickel cadmium battery, and as you probably know over time if you don’t use them, they won’t charge. I contacted the company, and yes, you can buy a new “power stick”, which is the battery and motor unit…for $90! (A new feeder is $165 now).  But…and here is the big problem I have. When I asked them if the batteries are nickel cadmium, or if they have upgraded to nickel metal hydride or lithium, they told me they are still NiCad. WHAT? You want me to pay $90 for something that I know will go bad again, so I can pay that much for it one more time? Um, how about no? So my husband and I did what the little power stick said not to. “Do Not Open This…Your Warranty Will Be Void If You Do”. Well it was out of warranty years ago. So we opened it, figured out what kind of NiCad batteries they were, did some internet sleuthing, and ordered them along with some wire glue so they could be connected the same way the originals were. Total costs with shipping? $22.67.

Kudos to a company too, since I can’t complain ALL the time. I absolutely LOVE the new top on the Advil for Arthritis bottles. It’s a bit larger and has a scalloped edge, making it easier to grasp if you have arthritis, which I’m starting to feel in my hands. I keep one in each level of my house and just refill from a larger bottle.

So apparently one company did listen to their customers, but will others? Is sure seems that if it helps customers but hurts their bottom line, we’ll never see that change, so we can probably kiss the sealable cereal bag goodbye. I still have hope for Dunkin’ Donuts though.  Any of you have suggestions for manufacturers, changes you’d like to see?

From the Files of…

Screen Shot 2018-07-04 at 8.56.56 AMIt’s time for another edition of “From the Files of…”, yes, those crazy stories I find in the news that I just can’t make up. I swear. At least this time I’ll start out with a cute one.  I have to admit; I read it because the title of the story made me go “huh?” It read “Cops were ‘lit’ and ‘turnt up’ at students’ prom, department says “. Now in my day, ‘lit’ meant either you’d been drinking, or were taking drugs, and I while I read “turnt”, my mind saw “tuned”, probably going back to the part about being lit up! This story is not about that, however and is a wonderful and fun little read.

Spell check, people. Seriously, why do professional writers fail this one so often? From a Politico article on May 30, 2018:

Screen Shot 2018-05-31 at 6.58.35 AM

An “ustice Department”. Huh. That might explain much of what’s wrong in Washington. Update: After two tweets to the author and to Politico and Politico Mag, NO CORRECTIONS have been done as of July 4, 2018. 

And CNN on June 24, 2018

Screen Shot 2018-06-24 at 1.46.03 PM

Here we lost the entire end of a sentence, and I guess this Johnson is describing, what, new wedding vows called “the do”? Update: As of July 4, this was corrected. Kudos to author Eli Watkins!

I do try to avoid clickbait articles, but every once in a while I just have to go to the ones on Trendchaser. If you haven’t, they’re often titled things like “the funniest things kids said this week” or “the best notes left on badly parked cars”. In keeping with our theme, from “Teachers Who Are Out to Get Their Students” (I included the link, they’re hilarious!)

Screen Shot 2018-07-02 at 7.14.01 AM

Sadly, I also just saw a story about Tina Turner’s son committing suicide, at People.com and while the article may have been spell checked, it certainly wasn’t proofread. Someone might be a tool, but things take a toll. Yikes.

Screen Shot 2018-07-03 at 7.20.25 PM

We’ll see how long it takes the writer to correct that biggie. Update: less than 24 hours after I tweeted to her that “spell check is NEVER replaced by proofreading.” Kudos to Alexia Fernandez for actually following up!

To wrap it all up, back to fun and lighthearted. Because it’s important to never take ourselves too seriously, I love it when a big corporation adopts that mindset as well. Take a look at the most recent tweet from Airbus, about the new transport plane that will go into service in 2019, called the Beluga XL. I love the paint job, and the accompanying text is awfully punny as well!

Happy Independence Day, celebrate safely! If you’re from slightly north, I offer my sincere apologies to Canada on behalf of the US, and Happy Canada Day!

Screen Shot 2018-07-04 at 8.44.51 AM

Things Mom Never Told You, Vol V

How to Keep Patio/Deck Plants Looking Fantastic All Summer…

Are you like me in that you absolutely LOVE having plants outside on your deck or patio in the summer time, but hate the chore of having to water them every day? My patio is my oasis from life, I have Adirondak chairs and side tables that are painted cheerful colors, and everything is done to give me a tropical, “down island” feel for those few months out of the year we have summer. Having lush, well-watered plants for me is a must, and in the beginning of the summer it’s fun, but honestly by August, it’s a chore. IMG_3638 (1).jpg

The solution was to install a drip irrigation system, which sounds difficult, but really isn’t at all. I purchased my initial setup from Proven Winners, although there are others out there including the DIG system I found at Home Depot, which is what I’ve supplemented with. Here is a link to a video about the Proven Winners system, and you can purchase directly from them as well.  The customer service staff at Proven Winners are incredibly helpful and have a really fast response time. I’ve had emails answered within a day and sometimes the same day. The DIG website has a wealth of information as well, take a look at it too.

The way the system works, is that you have a coupler consisting of a backflow valve and adapter, that reduces the water pressure from your system down, and then the drip tubing connects to that. You then run the drip tubing around to where you want for your plants. You cut the tubing and insert a coupler to branch off tubing to extend it. They have “T” shaped couplers if you want to just have a single extension off, and “X” shaped if you want to have 2 extensions plus continuing your run. There are also different drip heads as well, depending on your needs. You can bury the tubing in dirt or under rock to hide it, run it behind objects, etc.

For the past several years I’ve put a brass “Y” splitter on our outdoor spigot, which allows us to have our hose still connected and then the drip irrigation on the other side of the “Y”. On that side I connect an automatic watering timer. For our patio I use a 2-zone timer, so I can run two separate sets of tubing. One set goes one direction, to the flowers, and the other set goes the other way, to the tomatoes and a few other flowers. That allows me to set two separate sets of times and frequencies. This year I also ran tubing through PVC pipe that I buried in the grass between the landscaped area off the patio, and out to a landscaped area further into the yard where I have a few potted plants. Then I know they get watered on the days our sprinkler doesn’t run. Depending on how many plants my patio ends up having, I may end up getting a 4 zone timer, as I’m not sure how many times I can branch off the tubing before I lose water pressure.

Pros and Cons of The Two I’ve Used

Pros: What I like about Proven Winners’ system is that the tubing is softer and more flexible than the DIG tubing I found at Home Depot. That allows me to disconnect it from the connectors and watering ends each year so I can change up the configuration every year. Another thing that I really like about PW, and I mentioned this above, is their customer service. I had a small problem this year with a part, and emailed them one evening about it, telling them what the issue was, and how I had tried to troubleshoot it, asking what else I could try. A few hours later (at 11 pm!) I had a response, which was basically “sounds like you have a broken part, I checked your order history and will send you a new one tomorrow at no cost.” Am I going to keep going back to them? You bet I am!

A couple of nice things about DIG is that it’s readily available from Home Depot, and they do have a bigger variety of drip heads available. So if I’m in the middle of set up and run out, or if I find that some of mine are no longer working I can just run up there and get new ones. I don’t have to order them online and wait, and is a bit more cost effective.

Cons: The tubing from Proven Winners so far only comes in white and tan, while the tubing from DIG comes in brown and black. IMG_1341Our patio is stained a terra cotta color, so both white and tan tubing show up VERY well, as you can see. I did talk to the nice folks at Proven Winners and even sent them this picture of our patio with white tubing showing, letting them know that not everyone has white concrete patios and could they perhaps get brown tubing? They said they would mention it to their vendor, but so far their website still has only the white and tan.

Another con, and this is a biggie for me, is that the tubing from DIG is very rigid and inflexible, and much more difficult to remove it from the connectors. So if I want to change configuration I have to boil water, and put the connection in the water for several seconds to make the tubing very pliable and I can then pull it off. If it starts to cool down, it won’t come off.  At that point I have to go back in the house and reheat the water, or cut the tubing off the connector and then take a utility knife and cut away the small amount of tubing that is still on the connector to start over. I’m either wasting additional time or money. I sometimes have to use warm water to soften the connections from Proven Winners to get the tubing off, but the water can cool down a lot more before I have to reheat it, so I have a lot more working time with it first, and I find I don’t always have to do that. Sometimes I can just pull connections apart. However, do that too often and the Proven Winners tubing will stretch out at the connection, leaving you with a leak.

Overall, it’s a toss up. I like Proven Winners tubing better, but DIG has more watering end options and I really like that, plus their brochure is really informative. I do wish I had known about a drip irrigation system years ago, and if you’ve never tried one before, give it a shot. They really are easy to set up, and you’ll wonder how the heck you lived without one this long. Let me know if you have questions about setting one up, or your success using one.

My promise: I will never share something with you that I haven’t personally tried. I won’t tell you it works if I can’t prove it. Where possible I will share photos or a video. If something is an epic fail, well I’ll tell you that too as I think that is just as valuable, even if I end up looking ridiculous doing it.

Things Mom Never Told You, Vol IV

…How to Cheaply Make Homemade Magic Erasers!

It seemed like every time I turned around, I was seeing another use for Mr. Clean’s Magic Eraser sponge. “Get marks off your walls!” “mystery marks on cabinets? No problem!” and best of all, “scuff marks on patent leather go away so easily with the Magic Eraser” (it’s true, they do. When I was traveling for business I kept a small one in my wheeled computer bag for my work shoes.) But if you use these, you also know they can get expensive, as they also magically disintegrate and disappear with use.  At Target, Walmart, and Amazon, a 4 pack of the “original but 2x stronger” (if it’s 2x stronger, then how is that the original, but i digress) costs .87¢ a sponge. That adds up fast! So when I stumbled on an article about making your own for a whole lot cheaper, I thought I’d give it a try. I ordered melamine sponges from Amazon, and then made up a solution of warm water, Borax and baking soda. (1/2 cup warm water, 1 tsp Borax and 1 Tbsp baking soda.) After those were mostly dissolved in the water I dunked the sponge in the water, let it absorb the liquid then squeezed most of it out and tested it on some marks I found on a lamp. This is a free standing gooseneck floorlamp that I use for crafting, and my husband looked at it yesterday and wanted to know how I’d scratched it so badly.

fullsizeoutput_98c6

IMG_2229


After using my homemade magic eraser:

IMG_2231

IMG_2230


Estimated cost for my eraser? .59¢ for the sponge, 1.2¢ for the baking soda and <1¢ (.006 actually!) for the Borax for a total of under 61¢. Now I can guess what you’re thinking…20¢ isn’t a huge amount to save, and you could be right, especially if you’re a fanatic about coupons. But here’s the thing about that. I only bought a small bag of them because I didn’t want to be stuck with a huge container if this was a fail. I’ll keep working with them a bit but so far I’m happy with it. Assuming it does work well, you can get a bag of 100 for 7.59, which comes out to 7.5¢ per sponge, bringing your total cost per sponge, soda and Borax to less than 9¢. (And you can get more than one sponge saturated with the amount of liquid, so it’s really even cheaper than that!) As my husband and I like to joke around with each other, “How do ya like me now?”

…How to Clean Grippy Rubber

 Note: Includes an update on the homemade magic eraser. Have you ever had something with black rubber grippy stuff on it that has gotten really nasty? We had a remote control that was just plain gunky, covered with dust, cat hair and lord knows what else. After a fair amound of research, it seemed the best thing to use to clean it was WD40. So I tried putting that on my finger, then rubbing it on the rubber. I tried first wiping it off with a soft cloth, that didn’t work. I reapplied it and let it sit for a while, then wiping it off, that didn’t work either, still gunky. Third time I reapplied and let it sit, then came back and cleaned it off with my magic eraser. It completely removed the gunk. Disclaimer, it also did remove the grippiness of the rubber, which is probably from the abrasive action of the sponge. But you have to ask yourself if the trade-off was worth it, and for me the answer is “yes”. The alternative was not touching the remote, as the “eww” factor was getting up there.  (I also have tried cleaning grippy black rubber on something else with a store bought magic eraser and no WD40, didn’t work well at all.)

Extra notes of caution: Anytime you’re cleaning electronics, whether it’s a floor lamp, a remote control unit or anything else, just remember a couple of things. 1. Never spray anything directly onto your item. For the WD40, I applied it to my finger first, then used my finger to put it on the remote. Even though WD40 displaces water, and some people use it in electronics, my feeling is that it’s better to be safe. 2. Water is also not a friend of electronics. Squeeze out that sponge as if your life depends on it, and have paper towels close by to wipe off drips quickly. You really don’t want water getting inside the cases of things you’re working on. 

…How to Clean White Crusty Water Stains Off Things

You know the white crust that you get on things, like around your sink, or maybe on the drip tray for your ice maker, or even the floor mats of your car? I’m a great believer in less manual effort and more “find an easier way” if I can, and for that stuff I have. I soak it in some white vinegar. Usually about a 10% solution will do, but if it’s particularly stubborn I’ve gone stronger, even up to full strength. Yesterday I took the winter floor mats out of my car and poured some into them and let them soak for about an hour to get the salt residue loosened up. Worked like a charm! After I rinsed that off, I gave em a quick soap scrub and then they were done.  For sinks, I take an old rag and soak it, wrap it around the base of the faucet and let it soak for thirty minutes or so, then check and see if the crust has softened enough to either wipe off or scrape (gently and carefully) with a razor blade. We have a recirculating water fountain for our cats water dish, made of stainless steel that I’ll take apart and soak in vinegar as well. Again, why spend time scrubbing when I can soak that crap off? Put some in a spray bottle and spray down your shower, especially if you have glass doors. Let it sit for a bit then wipe off and it will help to get the built up soap scum off. If it’s really bad you might have to do it a few times.

My promise: I will never share something with you that I haven’t personally tried. I won’t tell you it works if I can’t prove it. Where possible I will share photos or a video. If something is an epic fail, well I’ll tell you that too as I think that is just as valuable, even if I end up looking ridiculous doing it.

Things Mom Never Told You, Vol III

Here’s the next edition of “Things Mom Never Told You”.

Have you ever wondered how to….

…Clean Tarnish Off Silver 

Because we all have so much good silver laying around the house, right? Well recently I did get a few pieces, and I wanted to make sure that they were cleaned up in the most gentle way I could. So once again, back to my ever trusty source of truth I went, and looked it up on the internet.

Line a sink or in my case I used a plastic bucket, with tin foil. Put the items you want to remove tarnish from in here. Cover them with boiling water, and to that add about 3 tablespoons of baking soda premixed with a teaspoon of salt. Let them soak for a few minutes. For heavy tarnish it may take up to 15-20 minutes. Some spots may even require some gentle scrubbing with a soft cloth, or if you have nooks and crannies in things you can gently clean them with a soft toothbrush. The tarnish transfers to the foil like magic, as you can see here, where the ring is on the foil.IMG_1968

After the tarnish is gone, remove them from the hot water and rinse WELL with more hot water to prevent pitting, then dry thoroughly. To prevent (or at least minimize) further tarnishing, first wrap in a soft cloth, then put into an airtight bag along with a small piece of chalk. The chalk with absorb moisture, which is what causes the tarnish. You can use this for both sterling silver as well as silver plated items. Check out my before and after photos of a silver plated sugar bowl:

That was in solution for about 2 minutes. That’s it.


…Scorch Marks from Fabric

I know, I know, who’s dumb enough to leave the iron on and down, right? Well before I got smart enough to buy one that lifts itself up when I take my hand off of it so that it CAN’T scorch anything, I will admit I may have done so on one or two occaisions. And of course if you’ve ever used spray starch, you know that it takes almost no time at all before you get discoloration that is nearly impossible to get out of fabric, right? Well here’s a tip that really works, provided the marks aren’t too horrendous.

Get a bottle of hydrogen peroxide, and several clean, old rags. Heat up the iron to the hottest setting the fabric can take, turn off the steam feature and put the fabric on an absorbent towel and pour some peroxide on the stain. You don’t need much, just enough to wet it. Lay a dry rag over the spot, and start ironing up the peroxide. The rag will absorb the peroxide, and the stain along with it. Continue ironing until the peroxide is dry. If any stain remains, do it again. You may need to do this several times before the stain comes out completely, but provided it wasn’t too bad it should come out. (I haven’t tested this on a huge variety of fabrics, primarily cotton and muslins, but it’s worked well on those.)

…Scuff Marks from Patent Leather

Use a Magic Eraser. Wet it a bit, and rub the scuff mark. Voila, gone like, well, magic!


My promise: I will never share something with you that I haven’t personally tried. I won’t tell you it works if I can’t prove it. Where possible I will share photos or a video. If something is an epic fail, well I’ll tell you that too as I think that is just as valuable, even if I end up looking ridiculous doing it.

Watermark


If you lived in the Minneapolis area in the summer of 2007, no doubt you remember exactly where you were and what you were doing in the moments after 6:05 pm on August 1. I was sitting in my living room, when my husband called from work about 6:20 and asked me if I had heard that the “35W bridge over the Mississippi had collapsed” and I remember sitting down on the sofa, stunned, trying to turn on the TV. Those initial moments were filled with confusion, as I thought he meant the bridge over the river in Bloomington. It wasn’t until I started to see the news reports that I realized it was the bridge near downtown Minneapolis, and along with thousands of others became mesmerized by the horrific images on the screen. Little did I know that among the victims was a distant cousin who I had never met, and now I never would, and a young woman who would soon have an impact on my life, but I wouldn’t realize it until years later.

That August day was like many others, hot at 92 degress and a bit muggy.  Picture yourself in the car driving home from work, or to some evening event. Perhaps you’re speaking to a loved on on the phone, or listening to music. You might have the window open in hopes of a breeze if your AC isn’t working, or if you were lucky and it is, the windows all up. Traffic is moving slowly since 4 of the 8 lanes are closed for bridge resurfacing and there is quite a bit of construction equipment about. Suddenly, you feel a slight jolt, a little bump, and wonder what it is, and then, without warning, the road under you is just gone and you’re free falling. You’re in your car, plunging toward the Mississippi River, along with other cars trucks, concrete, steel girders, rebar, gusset plates, dust…The sound is defeaning, then silence. You’re under water, or perhaps on the remainder of the bridge at an odd angle, or pinned under concrete or another car. In the water you desperately try to get out of your seatbelt and then out of your car, in the murky water. Some did, 13 did not; among them Peter Hausmann who initially made it out of his car, then dove under water again to try and help a woman and her child get out of theirs, and was pinned underwater by debris by her car.

That fall, after the collapse, I was working at a health insurance company here in the Twin Cities as a nurse case manager, and I can still remember being told to do whatever we could to help the victims. Normal rules were waived, dollar limits on services or lifetime limits, even waiving out of network restrictions.  We were given permission to go above and beyond what we normally did, to ensure their care went as smoothly as we possibly could with the least amount of stress to them given that they had already endured so much. I was involved in the care of a young woman who had been injured in the collapse, and due to the nature of her injuries I ended up speaking with her mother about her care rather than her. Her mother and I spoke fairly often that fall, which was good and bad…bad that they had to speak to me at all, but good in that they had someone on the other end of the line who could help. My recollection is that when I first started talking to her mom, there was a lot of frustration on her part because of the issues and roadblocks they had encountered, one of which had to do with being billed for her daughter seeing out of network doctors at the hospital she was sent to. Keep in mind she wasn’t given a choice where she went, people were triaged to hospitals based on their injuries and how many people had already gone to other hospitals. She also had no choice in the doctor she saw. So why should they have to worry about paying extra, when the choice was taken away? The answer was, they shouldn’t, and ultimately I worked to make sure they didn’t. That’s just one example of the kinds of things we helped with.

Last summer marked the 10th anniversary of the collapse, and as we approached August 1 there were the expected stories on our news channels, in the papers, and on the radio. Stories from survivors, and from the families and friends of those who didn’t survive, making sure that their loved ones aren’t forgotten by recounting wonderful stories about them. One of those stories came from the family of Peter Hausmann, a man who who I later learned from my mom was a cousin of my dad’s. (Between my mom and dad, they once counted all their first cousins – there were over 200! It’s not surprising we didn’t know some of them when you start getting to the second cousins, the “once removeds” and so on.) I don’t know exactly which level of cousin they were, but it wasn’t first cousin, I know that. After seeing a video about him on WCCO -TV, I wish I could have met him. He seems like he was a wonderful father, husband and man of faith, and I expect he’s very proud of his family and how they have carried on.

I also found myself wondering what ever happened to the young woman that I had helped to provide care for 10 years ago. I found out she is doing amazingly well, and is living her dream – in New York. She’s acting, singing and dancing in the theater there, doing what she always wanted to do. I don’t know how to explain what it felt like when I learned that, except to say that my heart feels so full of happiness for her. Now, seeing her photo, her face is full of joy and enthusiasm, of wonder and beauty.  When I saw her picture, my chest filled up and I started to cry. It was an amazing moment, knowing that she’s on her way to fulfilling her dream,  and I think about the fact there is that one brief moment in time that her dream almost didn’t get to happen – perhaps 20 or 30 feet in either direction and she may have died, but she didn’t. She inspires me, when I’m not sure if I can meet a challenge, or if I want to stretch myself. I just think about her, and I’m reminded what determination can accomplish. The most amazing part is, I don’t think she was ever aware of me, and certainly has no idea that 10 years on she is still having an impact.

Screen Shot 2017-09-27 at 10.09.47 PM


So many of us were impacted in one way or another, forever marked by the water: some literally, but most, invisibly. Today, a memorial stands near the site of the collapse, in memory of those who died that day. A granite slab with the names of those who died bears the following inscription :

“Our lives are not only defined by what happens, but by how we act in the face of it, not only by what life brings us, but by what we bring to life. Selfless actions and compassion create enduring community out of tragic events.” 

Things Mom Never Told You, Vol. II

From time to time I find these little helps referred to as “lifehacks” by many, a term my husband detests. I’ve put a couple of them together to share with you, and over time as I come across more I will keep doing so. I want to make you all a promise right out of the gate – I will never share something with you that I haven’t personally tried. I won’t tell you it works if I can’t prove it. Where possible I will share photos or a video. If something is an epic fail, well I’ll tell you that too as I think that is just as valuable. So with that, I bring you the next edition of “Things Mom Never Told You”.

Have you ever wondered how to….

…Really get the top of your travel coffee mug clean?

Me neither, until my husband took a good look at mine one day and said “um, honey, this is pretty nasty. You might want to give it a scrub.” Now, I rinsed out the top of my travel mug faithfully EVERY time I used it, with HOT running water. I have a spillproof Contigo, so I even held the button open so water ran through it. You’d think it would be clean. Nope. I tried soaking it a few hours in denture cleanser tablets…followed by a vinegar bath….followed by a mild bleach bath. Nothing worked. I even took old flannel sheets and ripped off little strips and poked ’em into the corners. Got lots of crap out, but I could see it still was gunky. After a bunch of searching on the internet (because we all know if you find it on the internet it’s true!),  I found the magic solution.

Mix a solution of about 1/3 vinegar and 2/3 water, enough volume to cover the top of your mug. Put it in a container large enough that it is a couple of inches higher than the mug top, and set it in the sink. (Do not omit this critical step! You’ll thank me later.) Add a generous tablespoon of baking soda, and watch it foam like CRAZY! When it’s done, you can put a lid on it and agitate, although you’ll need to take the lid off every few seconds to let the air out. You’ll be grossed out at the gunk that comes out of your lid. I’ve done it now 6 times, and still getting gunk out of mine, as you can see in the video that I posted online. In that I don’t put a cover on it, but just stirred it around a bit and let it sit and soak.

You can continue to add baking soda, until you don’t get any more foaming up. At that point the vinegar is neutralized and you’ll need to have fresh water/vinegar for cleaning. This also works to de-gunk the lid of your coffee carafe if you have a thermal type pot, and I even did the drip basket on our coffee maker and got some results. I expect it will work with anything with nooks and crannies you can’t get into. I keep hearing how good vinegar and baking soda are as cleaners, as both are cheap, so don’t be afraid to use them. A 1 lb box of off brand baking soda at my grocery store is $0.69, and a gallon of white vinegar is $2.99.

Another good use for vinegar is to soak an old rag or paper towel with it and wrap it around the base of your sink tap and handles, where they get calcium built up. snug it up and let it sit there for a half hour or so, nice and wet. (If you use a paper towel you may need to rewet it periodically with more vinegar as it will dry out.) When you remove the rag, much of the build up can be wiped away, and most of the rest will scrape away pretty easily with a razor blade.

…Get the most out of your tubes and bottles of lotion and makeup?

Got this one from my awesome manicurist Brenda, to whom I shall be forever grateful. I think this is one of those salon insider secrets no one wants you to ever know, but I’ll share anyhow. So…when you think that tube of moisturizer, conditioner, hand lotion…whatever it is…when you think you’ve shaken it a dozen times and tapped it on the counter ten more and just can’t get another drop out of it, here is what to do. Go and get a popsicle stick, a small zip top bag, and a scissors. Cut the tube apart near the opening, maybe 2 inches (less if it’s a small tube) and use the popsicle stick to scoop out what is left in the tube. You might even find some residual you can scrape out of the other end too, so don’t forget to check that side as well. I put the stick and the parts of the tube in the bag and close it up in between uses, so that whatever I’m scooping out doesn’t dry up over the course of the next few days, since the tube is now open to air. If you won’t be using up the product in the next few days, transfer it to another container that seals up well but is smaller. For one rather expensive  hair product I got 4 additional applications out of the tube!

To get additional liquid out of small glass bottles, try reforming a paper clip. Straighten it out first, then put a small loop on the end and bend the loop 90 degrees to the rest of the clip. You’ll probably need a needle nose pliers for this, and may even need to use the pliers to get the paper clip far enough into the jar, so keep it handy. You’ll also need a small container to put the residual liquid in. Tiny travel containers or containers with screw on lids from camping stores like REI or Gander Mountain work really well for this. Check out the  video below. In fairness, I’ll offer the following disclaimers: I could have spent a little more time scraping out the bottle to get more out of it or perhaps made my scraper a better design, but I wanted to demonstrate what could be done for the video. You nay come up with a better way to do it, so feel free to let me know in the comments if you do.

As an addendum, I ended up getting about 5 additional applications out of that bottle.


Have fun!